Beautiful decorated cookies begin long before the first swirl of icing. The right tools help you roll evenly, pipe clean lines, control color, prevent mess, and package finished cookies so they look polished instead of homemade in a rushed way. Whether you are preparing holiday treats, building a valentines cookie decorating kit, or learning how to decorate cookies for birthdays and parties, a thoughtful setup makes the entire process easier and more enjoyable.
You do not need a professional bakery to get professional-looking results. You need dependable basics, a few detail tools, and a clear understanding of what each item does. This guide walks through the essential cookie decorating supplies every beginner or hobby baker should consider, plus smart extras that can help you grow your skills over time.
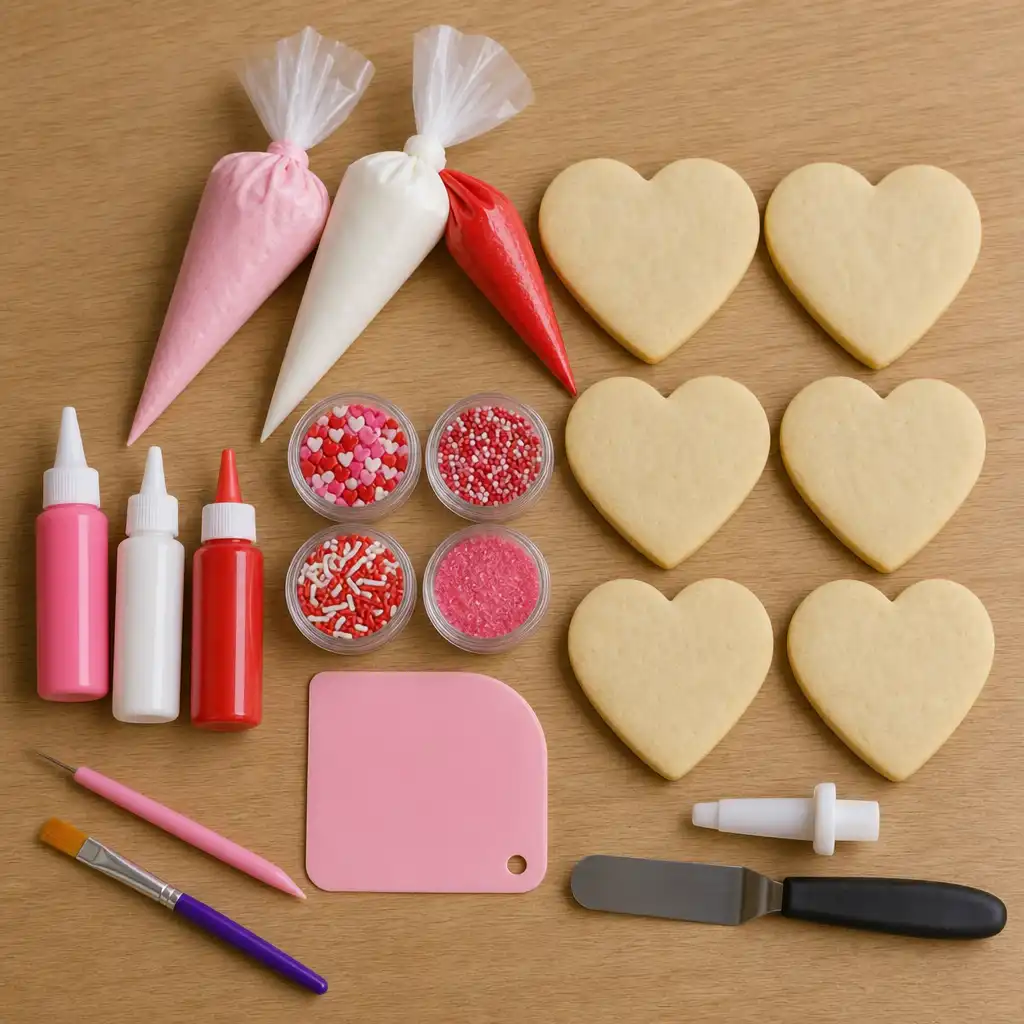
Start With a Reliable Cookie Foundation
Decorating success starts with the cookie itself. A soft, overly puffy, or uneven cookie can make icing difficult to control. For crisp designs, choose a cut-out cookie recipe that holds its shape and bakes flat.
The most useful base-cookie tools include:
- Rolling pin: A sturdy rolling pin helps create smooth dough sheets. Adjustable rolling pins with removable rings are especially helpful because they keep dough thickness consistent.
- Rolling guides: If your rolling pin is not adjustable, silicone or wooden guides can help you roll dough evenly from edge to edge.
- Cookie cutters: Start with versatile shapes such as circles, hearts, squares, stars, and seasonal designs. For a valentine cookie decorating kit, heart cutters in multiple sizes are a must.
- Bench scraper or offset spatula: These make it easier to lift delicate cut-outs without stretching them.
- Parchment paper or silicone baking mats: Both reduce sticking and help cookies bake evenly.
- Baking sheets: Heavy-duty, light-colored baking sheets are ideal because they distribute heat well and reduce over-browning.
- Cooling racks: Cookies need to cool completely before decorating. Even slight warmth can cause icing to melt, run, or lose definition.
If you want clean edges, chill the dough before cutting and again before baking. This simple step can make a dramatic difference in how polished your decorated cookies look.
Choosing the Right Cookie Decorating Kit
Icing is where cookie decorating becomes creative, but it is also where many beginners feel overwhelmed. The key is learning how to control icing consistency and using tools that support precision.
Royal Icing Basics
Royal icing is the most common choice for detailed cookie decorating because it dries firm and creates a smooth surface. It can be adjusted into different consistencies for outlining, flooding, lettering, and detail work.
Common icing consistencies include:
- Stiff icing: Best for flowers, textured borders, and dimensional accents.
- Medium icing: Useful for lettering, outlines, and small details.
- Flood icing: Thinner icing used to fill larger cookie sections smoothly.
You can mix royal icing from scratch or use a mix. Beginners often appreciate mixes because they reduce guesswork, especially when preparing a cookie decorating kit for a party, classroom activity, or family baking day.
Piping Bags and Bottles
Piping bags are essential for outlining and detail work. Disposable bags are convenient, while reusable bags are more eco-friendly and sturdy. Keep several sizes on hand so you can switch between colors easily.
Squeeze bottles can be helpful for flood icing, especially for children or beginners. They provide a little more control and are less messy than open bags. If you plan to host a decorating activity, including bottles in your cookie decorating supplies can make the experience smoother for everyone.
Piping Tips and Couplers
You can decorate cookies with tipless piping bags, but metal piping tips offer more control for specific effects. Good starter tips include:
- Small round tips: Ideal for outlines, dots, lettering, and fine details.
- Larger round tips: Good for flooding, borders, and bold designs.
- Star tips: Useful for textured borders, rosettes, and decorative accents.
- Leaf tips: Great for floral and botanical designs.
Couplers allow you to switch tips without changing icing bags. This is especially useful when using one color for multiple decorating techniques.
Add Detail Tools for Cleaner Designs
Once you have cookies and icing covered, detail tools help transform simple designs into polished treats. These items are small, but they make a big impact.
Scribe Tool or Toothpicks
A scribe tool is one of the most useful cookie decorating supplies you can own. It helps you:
- Pop air bubbles in wet icing.
- Pull icing into corners.
- Smooth small imperfections.
- Create wet-on-wet designs such as hearts, flowers, and marbling.
Toothpicks can work in a pinch, but a scribe tool gives you more control and is easier to clean.
Tweezers
Food-safe tweezers are helpful for placing tiny sprinkles, edible pearls, and delicate accents. They are especially useful for detailed holiday cookies where placement matters.
Edible Markers
Edible markers are great for sketching guidelines on dry icing, adding facial features, writing simple messages, or drawing tiny details. They are beginner-friendly and excellent for kids who want to decorate cookies without managing piping bags.
Small Brushes
Food-safe brushes can be used for painting with gel color, adding shimmer dust, brushing away crumbs, or creating watercolor effects. Keep a few brush sizes in your kit, including a fine detail brush and a wider soft brush.

Build a Smart Color Collection
Color can make or break a cookie design. Liquid food coloring can thin icing too much, so gel food coloring is usually the better choice for decorated cookies. Gel color is concentrated, vibrant, and easier to control.
A strong starter palette includes:
- Red
- Pink
- Yellow
- Blue
- Green
- Brown
- Black
- White gel color for brightening and correcting shades
For a valentines cookie decorating kit, focus on red, blush pink, hot pink, white, lavender, and chocolate brown. These shades work beautifully for hearts, love notes, florals, conversation cookies, and romantic patterns.
When coloring icing, start with a small amount of gel and gradually build intensity. Colors often deepen as icing rests, so mix them ahead of time when possible. This is especially true for red, black, and deep pink.
Stock Up on Decorative Finishes
Sprinkles and edible decorations add texture, sparkle, and personality. They also make decorating more accessible for beginners because they can turn a simple iced cookie into something festive.
Consider keeping these finishes in your decorating area:
- Nonpareils: Tiny round sprinkles that add color and texture.
- Jimmies: Classic long sprinkles for playful designs.
- Sanding sugar: Adds sparkle and crunch.
- Edible pearls: Great for elegant cookies, wedding favors, and floral designs.
- Confetti sprinkles: Fun for birthdays and celebrations.
- Luster dust or edible glitter: Adds shimmer when used appropriately.
- Mini heart sprinkles: Perfect for a valentine cookie decorating kit.
Always check that decorative items are edible, not just non-toxic. Some decorative glitters and dusts are intended for display only, so choose products clearly labeled for food use.
Organize Your Workspace Before You Begin
A clean, organized workspace makes decorating less stressful. Cookie decorating often involves multiple colors, consistencies, bags, tools, and drying trays. If everything is scattered, the process can become messy fast.
Before you begin, set up zones:
- Cookie zone: Cooled cookies ready for decorating.
- Icing zone: Filled bags or bottles arranged by color.
- Tool zone: Scribe tool, scissors, towels, tweezers, and tips within reach.
- Decoration zone: Sprinkles, sugars, and edible accents in small bowls.
- Drying zone: Trays or racks where finished cookies can sit undisturbed.
Use damp paper towels to cover piping tips when they are not in use. Royal icing dries quickly, and clogged tips can interrupt your flow. Keep a clean towel nearby for wiping tools and hands.
Must-Have Supplies for Beginners
If you are new and do not want to overbuy, start with a focused collection. A beginner-friendly cookie decorating kit should include:
- A dependable cut-out cookie recipe or mix
- A rolling pin and rolling guides
- Basic cookie cutters
- Parchment paper or silicone mats
- Royal icing mix or ingredients
- Gel food colors
- Disposable or reusable piping bags
- Small round piping tips or tipless bags
- Couplers if using metal tips
- Scribe tool
- Food-safe tweezers
- Sprinkles and sanding sugar
- Cooling racks or drying trays
- Airtight containers for storage
- Treat bags or boxes for gifting
This basic setup gives you enough flexibility to decorate cookies for holidays, parties, gifts, and everyday baking projects without feeling overwhelmed by specialty tools.
What to Include in a Valentine-Themed Kit
A valentines cookie decorating kit should feel festive, easy to use, and visually cohesive. Whether you are making one for yourself, gifting it, or setting up a group activity, choose supplies that support classic Valentine designs.
Include items such as:
- Heart-shaped cookies in two or three sizes
- Royal icing in white, red, pink, and light purple
- Tipless piping bags or small squeeze bottles
- Mini heart sprinkles
- Pink and red sanding sugar
- Edible markers for messages
- Conversation-heart design ideas
- A small scribe tool or toothpicks
- Simple instruction cards for beginners
- Clear treat bags and ribbon for finished cookies
A well-planned valentines cookie decorating kit should not include too many options. Too many colors and decorations can make the activity feel cluttered. A limited palette often creates prettier results because every cookie looks like part of the same collection.
Helpful Extras as Your Skills Improve
After you master the basics, a few upgraded tools can help you create more refined designs.
Projector
A small decorating projector can help with lettering, character cookies, logos, and symmetrical designs. It projects an image onto the cookie so you can trace it with icing or edible marker.
Airbrush System
An airbrush adds gradients, shading, stenciled patterns, and soft backgrounds. It is not necessary for beginners, but it can expand your design possibilities.
Stencils
Cookie stencils help create repeated patterns, lettering, lace effects, and seasonal backgrounds. They can be used with royal icing, airbrushing, or edible dust.
Dehydrator
Some decorators use a dehydrator on a low setting to help royal icing crust faster and add shine. This can be useful in humid environments, but it should be used carefully to avoid drying cookies too much.
Turntable
A small cake turntable can help when piping borders, painting details, or working on larger cookies. Being able to rotate the cookie instead of twisting your wrist improves control.
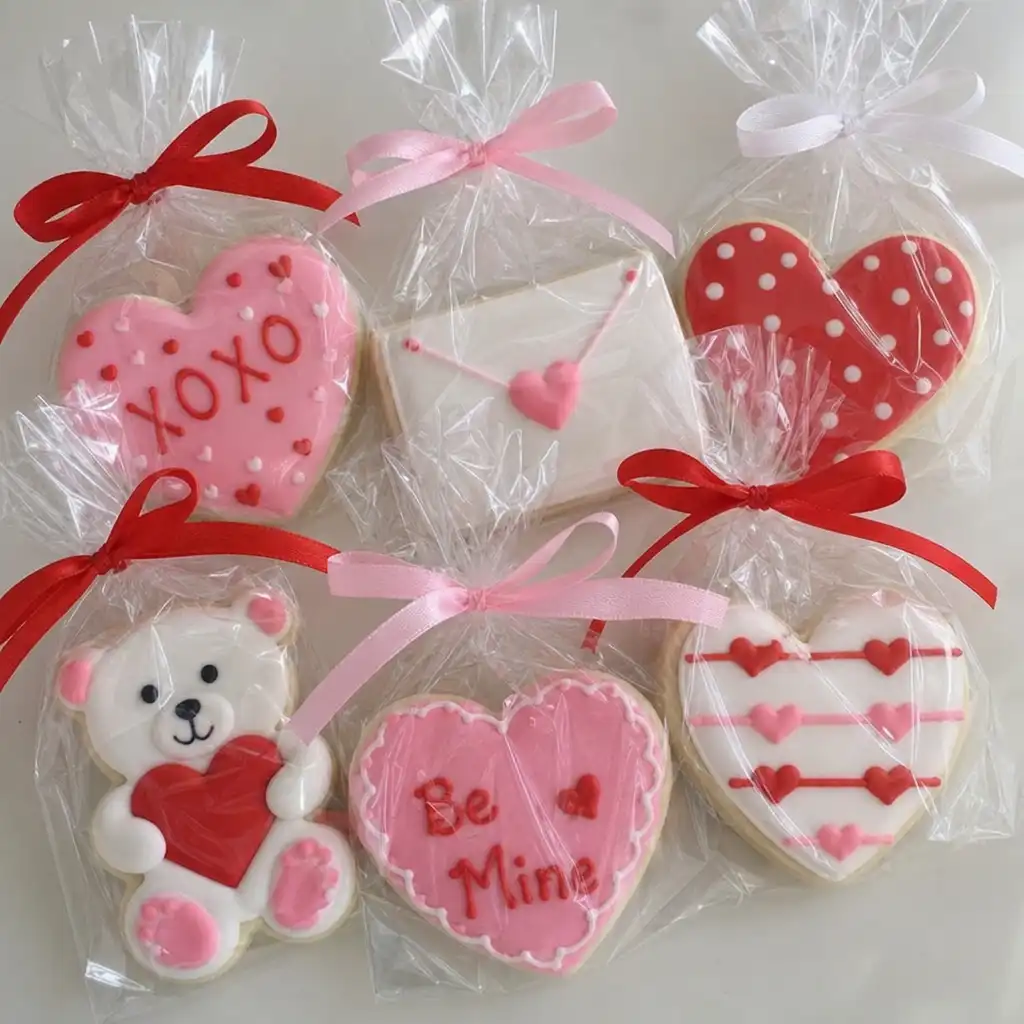
Storage and Packaging Supplies
Once your cookies are decorated, proper storage protects your work. Let royal icing dry completely before stacking or packaging. Depending on icing thickness and humidity, this can take several hours or overnight.
Useful storage and packaging supplies include:
- Airtight containers
- Parchment sheets for layering
- Clear treat bags
- Cookie boxes
- Food-safe tissue or crinkle paper
- Ribbon, tags, or labels
- Heat sealer for a more polished finish
If you are gifting cookies, package them only after the icing is fully set. Rushing this step can cause smudges, dents, or color transfer.
Common Decorating Mistakes and How to Avoid Them
Even with the best tools, cookie decorating takes practice. Most mistakes are easy to fix once you know what causes them.
Icing Is Too Runny
If icing runs over the edge of the cookie, it is probably too thin. Add a small amount of powdered sugar to thicken it. For future batches, thin icing gradually with tiny amounts of water.
Icing Is Too Thick
If icing will not settle smoothly or leaves peaks, it may be too thick. Add water a few drops at a time until it flows more easily.
Colors Bleed
Color bleeding can happen when dark icing touches light icing, especially in humid conditions. Let base layers dry before adding darker details, and avoid oversaturating icing with food color.
Cookies Break During Decorating
Cookies may be too thin, too soft, or handled too soon after baking. Roll dough evenly, bake until set, and let cookies cool completely before moving them into your decorating area.
Designs Look Messy
Messy lines often come from inconsistent pressure or icing that is the wrong texture. Practice piping lines on parchment before decorating your cookies. Hold the bag slightly above the cookie and let the icing fall into place instead of dragging the tip across the surface.
Best Practices for Better Results
A few habits can improve your decorating immediately:
- Bake cookies a day ahead so decorating day feels relaxed.
- Make icing colors in advance to allow shades to deepen.
- Test icing consistency before filling every bag.
- Keep designs simple when decorating many cookies.
- Use a scribe tool while icing is wet for smooth finishes.
- Let each layer dry before adding details on top.
- Take breaks to avoid hand fatigue and rushed piping.
- Photograph your finished sets so you can track progress.
If you are decorating with kids, simplify the setup. Use squeeze bottles, a few icing colors, and larger sprinkles. The goal is creativity and fun, not perfection.
How to Choose the Best Supplies for Your Needs
The best cookie decorating supplies depend on how often you bake, what designs you enjoy, and whether you decorate alone or with groups. Beginners should prioritize versatile, affordable tools. More experienced decorators may want specialty cutters, stencils, projectors, or airbrush equipment.
Ask yourself:
- Will I decorate cookies only for holidays or throughout the year?
- Do I prefer simple designs or detailed artwork?
- Am I decorating with children or adults?
- Do I need supplies for gifting, selling, or personal use?
- How much storage space do I have?
If you decorate seasonally, build small themed kits. A valentine cookie decorating kit might include hearts, pink icing, and romantic sprinkles, while a winter kit might include snowflakes, white sanding sugar, and blue gel colors. This approach keeps supplies organized and prevents waste.
Final Thoughts for Confident Decorating
Cookie decorating is a skill built through repetition, patience, and the right setup. Start with strong basics: evenly baked cookies, properly mixed icing, reliable piping bags, gel colors, and a few detail tools. From there, add decorative finishes and specialty equipment as your confidence grows.
You do not need every tool at once to decorate cookies beautifully. A simple, well-organized cookie decorating kit can help you create impressive designs for holidays, gifts, parties, and everyday treats. With practice and the right supplies within reach, each batch becomes easier, cleaner, and more creative.