The Complete Guide to Baby Shower Cookie Cutters: Shapes, Materials, Recipes, and Decorating Techniques
Table of Contents
- 1. Overview: Why Custom Baby Shower Cookies Matter
- 2. Essential Baby Shower Cookie Cutter Shapes and Popular Themes
- 3. Material Breakdown: Stainless Steel, Tinplate, Plastic, and 3D-Printed Cutters
- 4. Cutter Sizing Strategy and Dough Yield Calculation
- 5. The Science of No-Spread Sugar Cookie Dough
- 6. Step-by-Step Cutting, Chilling, and Baking Workflow
- 7. Comparison: Cutter Types and Materials
- 8. Royal Icing Strategies for Baby Shower Shapes
- 9. Packaging, Favor Presentation, and Storage Timelines
- 10. Expert Tips for Delicate Cutters and Intricate Shapes
- 11. Common Mistakes and How to Avoid Them
- 12. Best Practices for Event Hosts and DIY Bakers
- 13. Recommended Tools and Equipment
- 14. Related Internal Reading Suggestions
- 15. External Authority References
- 16. Key Takeaways
- 17. Frequently Asked Questions (FAQ)
Quick Summary: Choosing and Using Baby Shower Cookie Cutters
Baby shower cookie cutters are specialized baking tools designed to cut dough into baby-themed shapes like onesies, bottles, rattles, strollers, and plaques. The best cutters are made of food-grade stainless steel for longevity or food-safe PLA plastic for detailed 3D designs.
To achieve sharp edges, use a high-fat, no-spread sugar cookie dough rolled between 1/4-inch and 5/16-inch thickness. Dip your cutters in flour between presses, cut straight down without twisting, and freeze the cut shapes for 10 to 15 minutes before baking.
- Core Shapes: Onesies, baby bottles, rattles, prams, and personalized plaques.
- Ideal Materials: Stainless steel for sharp cuts; food-safe plastic for complex imprints.
- Success Rule: Eliminate excess leavening agents and maintain cold dough temperatures to prevent spreading.
1. Overview: Why Custom Baby Shower Cookies Matter
Custom-decorated sugar cookies serve as edible centerpieces, thoughtful party favors, and memorable treats for welcoming a new baby. Using the right baby shower cookie cutters is the foundation of every professional-looking cookie set.
This guide is written for expectant parents planning their celebrations, friends and relatives hosting a shower, and home bakers seeking reliable DIY techniques. You will learn how to choose the right cutter shapes, select durable materials, bake cookies that retain their silhouette, and apply clean decorating techniques.
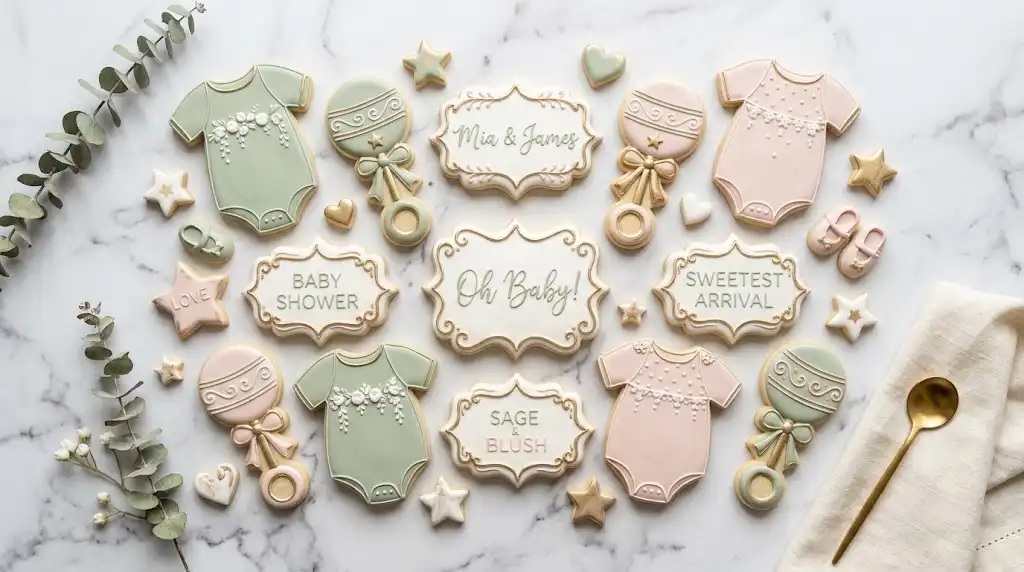
Every step in the cookie-making process affects the final result. From dough chemistry to cutter physics and royal icing consistency, small adjustments lead to bakery-quality results at home.
2. Essential Baby Shower Cookie Cutter Shapes and Popular Themes
Selecting the right shapes creates a cohesive visual theme for your dessert table. A balanced set usually includes a mix of classic baby motifs, thematic elements, and personalized name plaques.
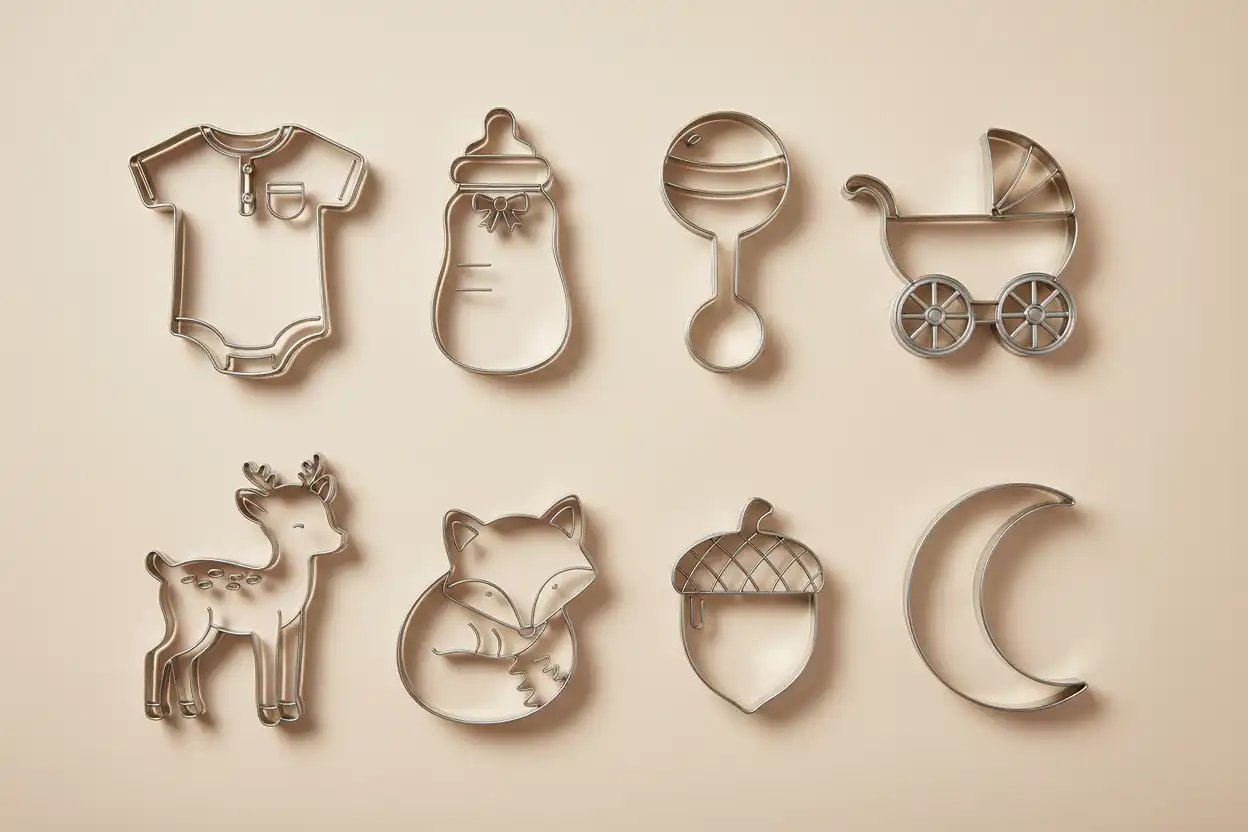
The Classic Essentials
Classic baby motifs are instantly recognizable and offer large, flat surface areas that make decorating straightforward for beginners:
- The Onesie / Bodysuit: The most versatile shape in any collection. It accommodates monograms, animal prints, suspenders, florals, or simple color flooding.
- The Baby Bottle: Great for practicing two-tone flooding, measurement markers, and cute typography like “Baby.”
- The Rattle: Features a round top and narrow stem. It provides great practice for piping clean borders and wet-on-wet dots.
- The Pram / Stroller: Offers vintage charm with wheels and hoods. This shape benefits from distinct structural piping lines.
- Footprints and Handprints: Distinctive shapes that look beautiful with simple pastel flooding or personalized birth weight text.
- The Bib: A forgiving canvas ideal for delicate lace borders and cursive lettering.
Modern Thematic Sets
Modern baby showers often move beyond simple pastel themes. Today’s popular themes use specialized cutter silhouettes:
- Woodland Creatures: Deer, foxes, acorns, hedgehogs, and mushrooms paired with soft forest greens and warm taupes.
- Safari Adventure: Giraffes, baby elephants, lions, and monstera leaves using sage green, dusty ochre, and warm white.
- Celestial / “Over the Moon”: Crescent moons, puffy clouds, shooting stars, and sleeping suns with gold accents and navy or blush tones.
- Boho Rainbow & Florals: Multi-tiered arches, sunbursts, pampas grass plaques, and botanical sprigs.
- Teddy Bear Picnic: Textured teddy bear silhouettes, honey jars, and gingham-patterned squares.
Plaques, Banners, and Framing Cutters
Never plan a baby shower set with only novelty shapes. Framed plaque cutters provide clean backgrounds for custom calligraphy, baby names, arrival dates, and meaningful phrases like “Welcome Little One.”
Top plaque styles include the scalloped rectangle, baroque frame, hexagon, and elongated ribbon banner. Adding two framed plaques to every dozen cookies balances out the novelty shapes.
3. Material Breakdown: Stainless Steel, Tinplate, Plastic, and 3D-Printed Cutters
Cookie cutters come in different materials, each with unique performance qualities, maintenance needs, and life spans. Understanding these differences helps you build a reliable baking kit.
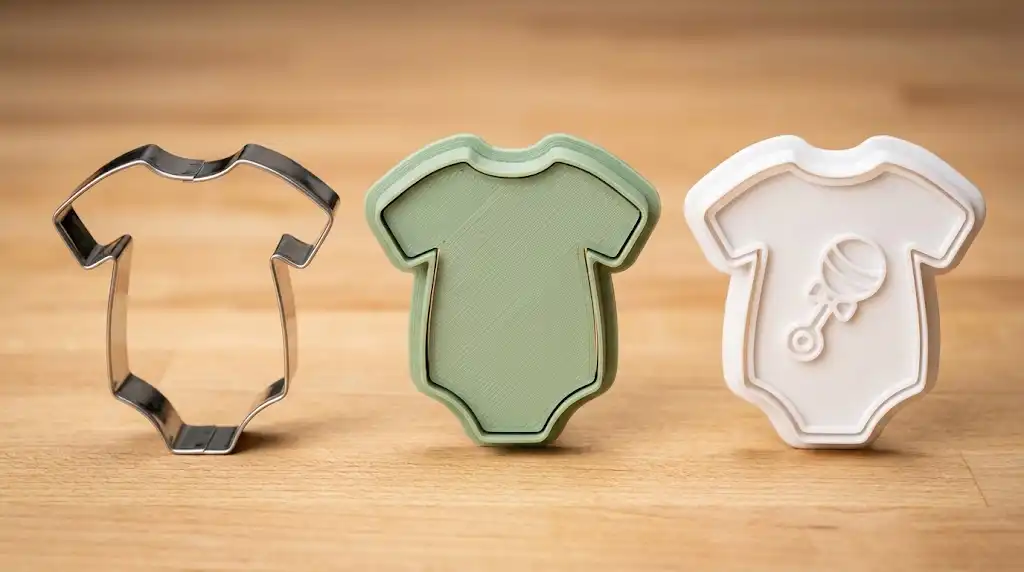
Stainless Steel Cutters
Stainless steel is the gold standard for professional bakers. It features a thin, razor-sharp cutting edge that slices cleanly through chilled butter dough without compressing the edges.
These cutters are rust-resistant, dishwasher-safe, and retain their rigid shape under firm downward pressure. They cost slightly more than basic tin, but they last for years without bending or degrading.
Tinplated Steel Cutters
Tinplated steel is a classic, budget-friendly option found in many commercial baking sets. It produces clean, sharp cuts through dense doughs.
However, tinplate is prone to rust if exposed to moisture. You must wash these cutters by hand and dry them immediately in a warm oven with the heat turned off. They also bend easily if stored under heavier items.
Commercial Injection-Molded Plastic
Plastic cutters made from food-grade polypropylene or nylon are durable, kid-safe, and will not bend or rust. They often feature rounded top rims for comfortable pressing.
The cutting edge is slightly thicker than metal, which can result in rounded cookie edges if the dough is too warm. Look for plastic cutters with bevelled taper edges for clean cuts.
3D-Printed PLA and PETG Cutters
3D-printed cutters made from Polylactic Acid (PLA) or Polyethylene Terephthalate Glycol (PETG) allow independent cookie artists to produce custom shapes, unique fonts, and matching outline-plus-stamp sets.
PLA is a biodegradable thermoplastic made from plant starch. It has a low melting point (around 60°C / 140°F) and will warp in high heat. Never place 3D-printed cutters in the dishwasher or submerge them in hot water. Wash them by hand using lukewarm water, mild dish soap, and a soft-bristle brush to clean between the print layers.
4. Cutter Sizing Strategy and Dough Yield Calculation
Cutter size affects your baking time, icing volume, packaging options, and how many cookies each batch of dough will yield. Planning your cutter dimensions early ensures a smooth baking schedule.
Standard Sizing Categories
- Standard Favor Size (3.5 to 4 inches): The industry standard for individual packaging. These shapes provide enough room for detailed royal icing without being fragile.
- Mini Accent Cutters (1.5 to 2 inches): Perfect for platter fillers, party snack bowls, or topping cupcakes. They bake quickly (5 to 7 minutes) and need simpler decorating.
- Centerpiece / Jumbo Cutters (4.5 to 5.5 inches): Used for milestone announcements, large personalized plaques, or focal cookies on a display stand.
Dough Yield Calculations
A standard single batch of rolled sugar cookie dough yields approximately 450 to 500 square inches of rolled surface area at 1/4-inch thickness. Below is an estimate of how many cookies you will get per batch based on cutter size:
- 2-Inch Mini Cutters: 36 to 42 cookies per batch.
- 3.5-Inch Standard Cutters: 18 to 24 cookies per batch (accounting for re-rolling scrap dough twice).
- 4.5-Inch Jumbo Cutters: 10 to 12 cookies per batch.
Pro Planning Tip: Always calculate for 15% extra cookies to account for baking flaws, dropped cookies, or icing practice runs.
5. The Science of No-Spread Sugar Cookie Dough
The most detailed baby shower cookie cutter will not produce good results if your dough spreads in the oven. When a onesie loses its sleeves or a pram turns into a blob, the problem is usually dough formulation.
Why Cookie Dough Spreads
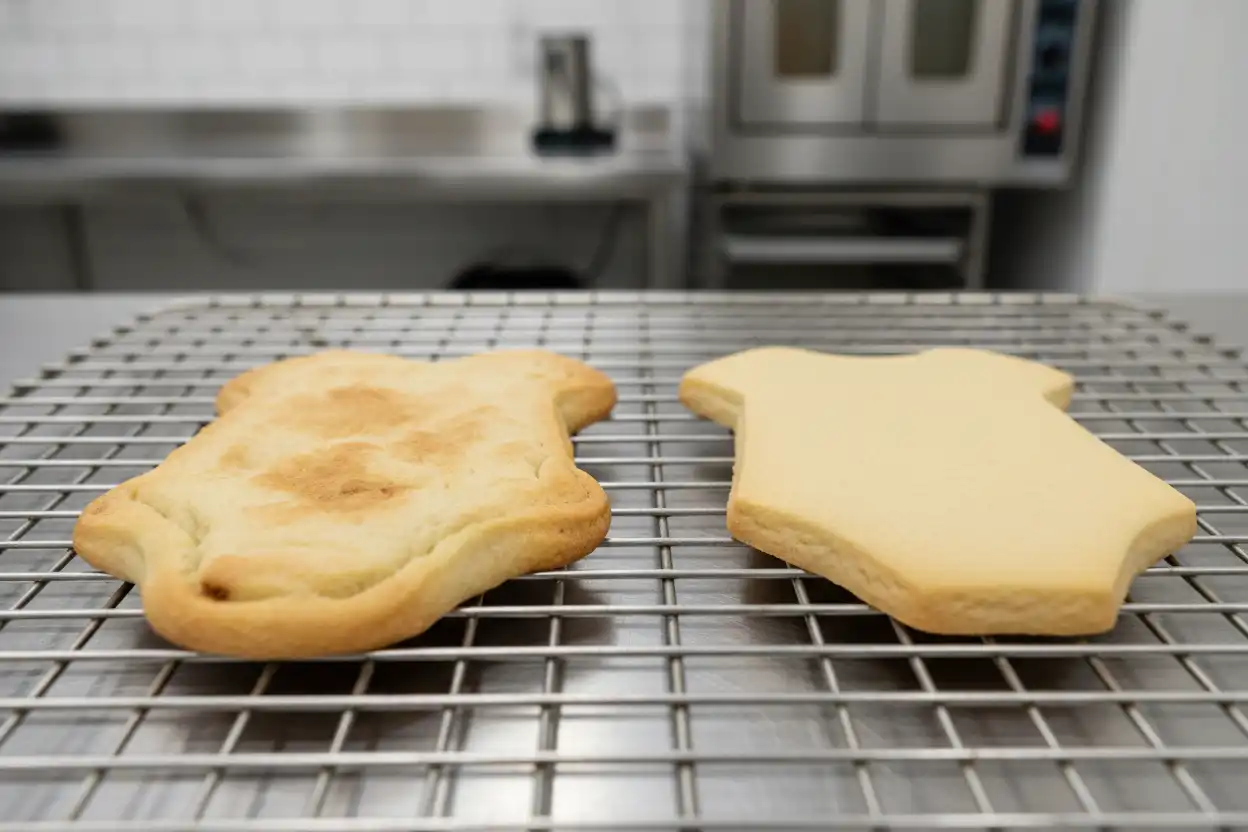
Dough expands and loses its shape because of three primary factors:
- Excess Leavening: Baking powder and baking soda release carbon dioxide gas. This creates lift, softens the cookie, and blurs sharp cutter edges. Cut leaveners to minimal amounts or omit them entirely for crisp shapes.
- Warm Butter Fat: Butter melts at body temperature (around 90°F to 95°F). If warm butter enters a hot oven, it liquefies before the flour’s gluten structure can set, causing the edges to puddle outward.
- Too Much Aeration: Creaming butter and sugar for too long whips air pockets into the fat. These pockets expand in the oven and cause puffing. Cream your butter and sugar only until combined (1 to 2 minutes), rather than beating them until light and fluffy.
The Professional No-Spread Recipe Formula
To ensure your baby shower shapes bake with sharp, clean edges, use this balanced formula:
- Unsalted Butter (Cold to Room Temp, 65°F): 1 cup (226g)
- Granulated White Sugar: 1 cup (200g)
- Large Egg (Cold): 1 whole egg (50g)
- Pure Vanilla Extract & Emulsion: 1 to 2 teaspoons (5-10ml)
- All-Purpose Flour (10.5-11.5% protein): 3 cups (360g to 375g)
- Fine Sea Salt: 1/2 teaspoon (3g)
- Baking Powder (Optional, for slight bite): 1/4 teaspoon (1g) maximum
6. Step-by-Step Cutting, Chilling, and Baking Workflow
Follow this tested workflow to get sharp edges and flat baking surfaces with your baby shower cookie cutters.
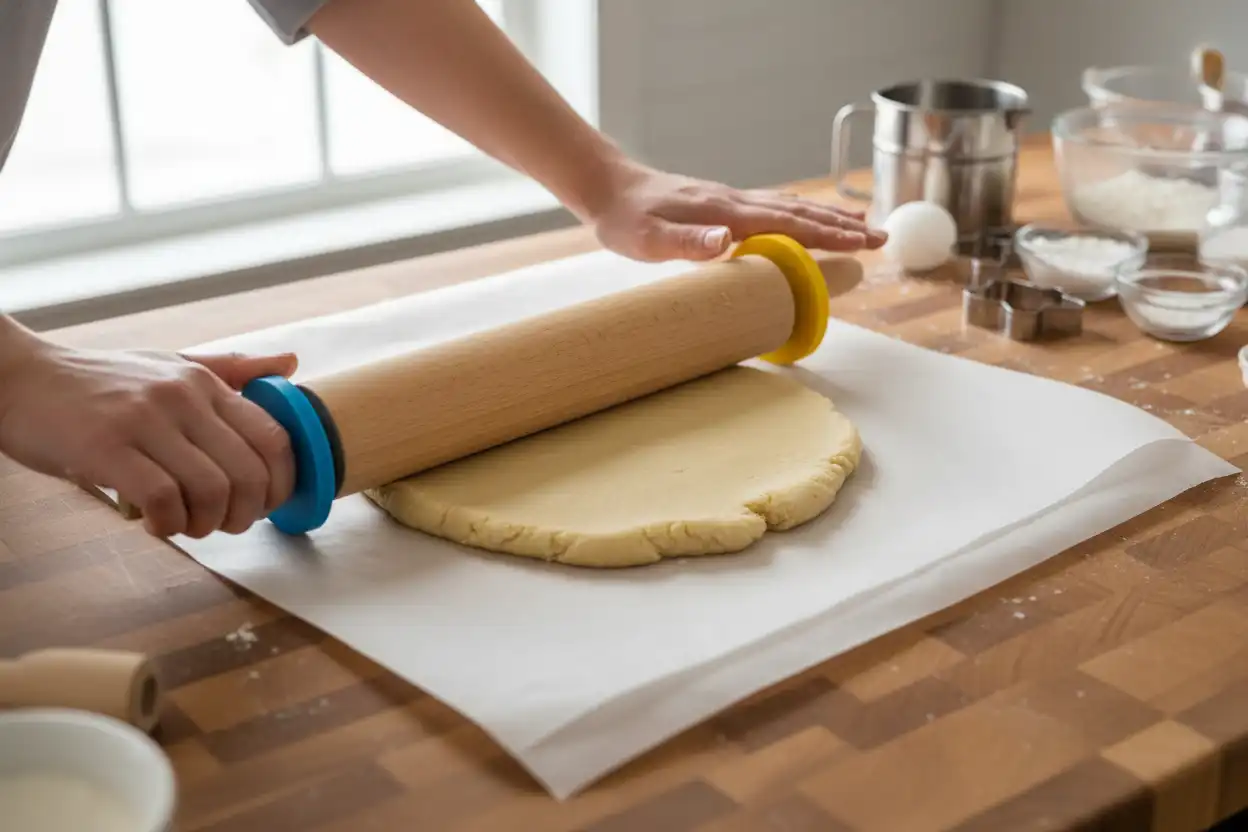
Step 1: Roll Dough Immediately Between Parchment
What: Roll your dough out directly after mixing, before chilling it in the refrigerator.
Why: Warm dough is soft and pliable. Rolling it while warm avoids the cracking that happens when rolling cold, firm butter dough.
How: Place the freshly mixed dough ball between two large sheets of unbleached parchment paper. Use a rolling pin fitted with 1/4-inch or 5/16-inch silicone guide rings. Roll outward from the center until the surface is completely flat and level. Transfer the rolled sheets onto a flat baking tray and chill in the refrigerator for at least 60 minutes (or freeze for 20 minutes).
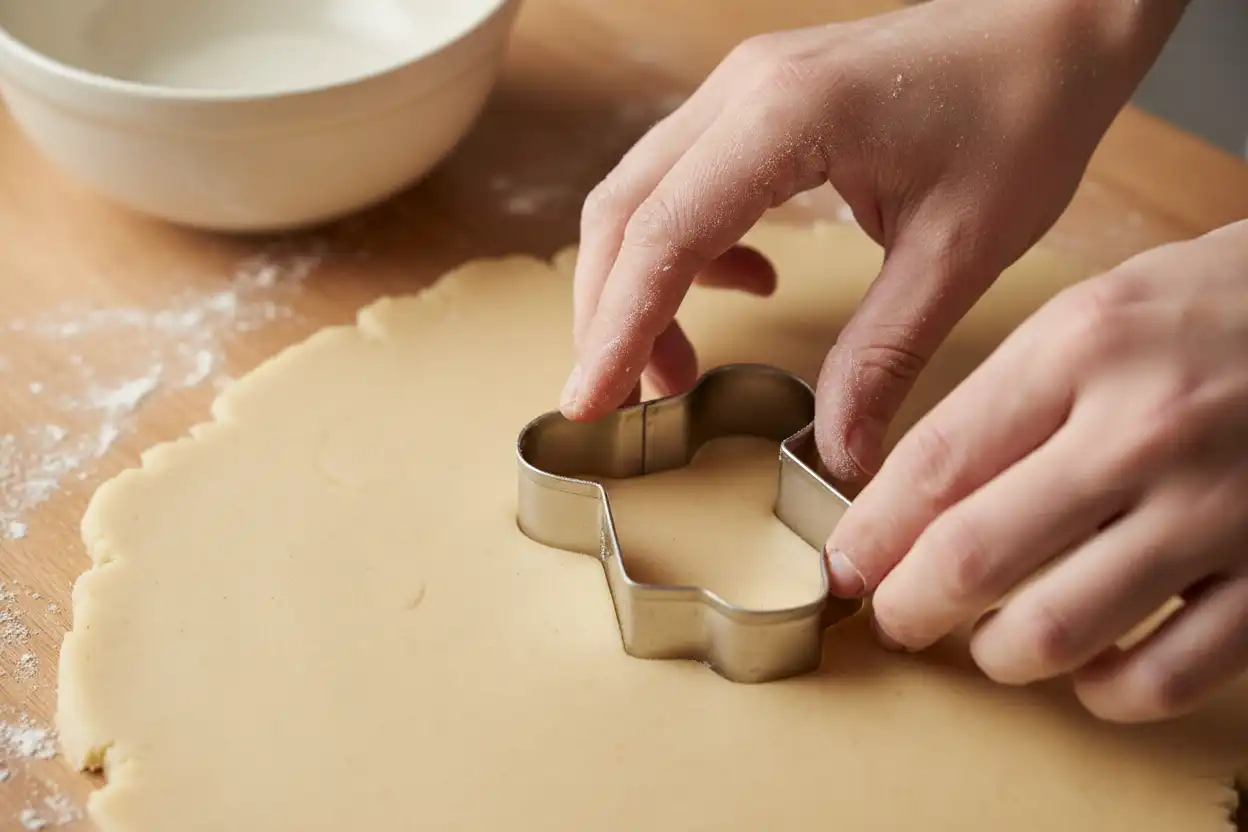
Step 2: Dust and Cut Vertically
What: Cut out your shapes using cold dough sheets and a light dusting of flour or cornstarch.
Why: A lightly dusted cutter edge cuts cleanly through the fat and starch matrix without grabbing or tearing delicate corners.
How: Dip the cutting edge into a shallow bowl of all-purpose flour. Tap off the excess. Press the cutter straight down into the cold, firm dough. Apply even pressure across the entire top rim. Do not twist the cutter. Twisting stretches the dough fibers and distorts the shape during baking.
Step 3: Transfer with a Bench Scraper
What: Move the cut shapes from your work surface to the baking sheet using an offset spatula or metal bench scraper.
Why: Lifting delicate dough cuts with your fingers transfers body heat and stretches narrow sections like bottle necks or rattle stems.
How: Peel away the scrap dough from around the cut shapes first. Slide a thin metal bench scraper under each cut cookie and transfer it onto a baking sheet lined with a perforated silicone baking mat or parchment paper. Keep at least 1.5 inches of space between cookies.
Step 4: The Second Chill (The Freezer Shock)
What: Place the baking sheet with cut cookies into the freezer for 10 to 15 minutes right before baking.
Why: This solidifies the butter fats completely. When placed into a preheated oven, the outer crust sets before the interior fats can melt, locking in the cutter’s exact shape.
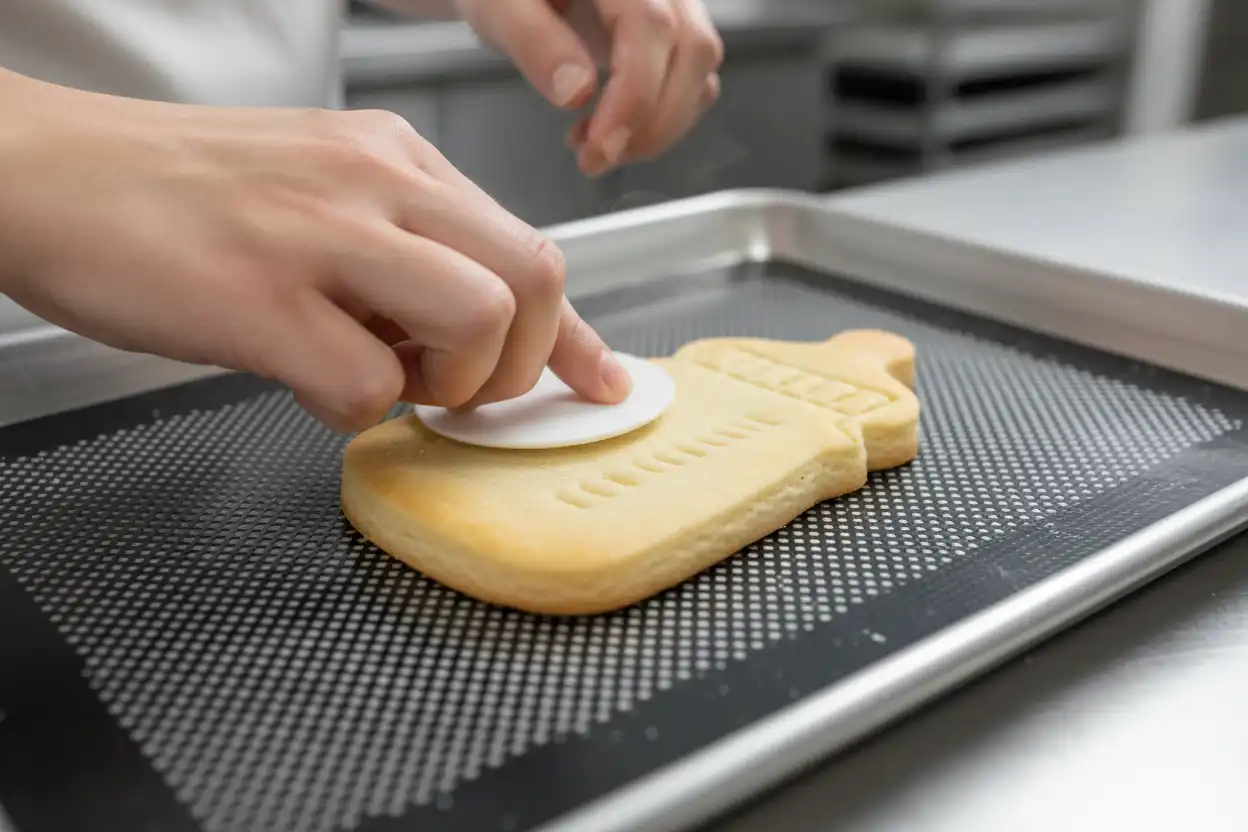
Step 5: Precision Baking and the Fondant Smoother Technique
What: Bake at 350°F (175°C) for 10 to 14 minutes, then smooth the tops immediately after removing from the oven.
Why: Minor heat bubbles and doming can make royal icing flooding difficult. Smoothing creates a flat surface for decorating.
How: Bake until the centers are matte and the bottom edges show light golden color. Remove the tray from the oven. Immediately and gently buff the top surface of each hot cookie with a food-safe plastic fondant smoother using light circular motions. Let cookies rest on the hot pan for 8 minutes before transferring to a wire cooling rack.
7. Comparison: Cutter Types and Materials
Compare cutter materials below to choose the best option for your budget, design needs, and skill level.
| Material | Cutting Edge Sharpness | Durability | Cleaning & Care | Best For |
|---|---|---|---|---|
| Stainless Steel | Very High (Razor clean) | Decades; rust-proof & rigid | Dishwasher safe | Standard classic shapes & high volume |
| Tinplated Steel | High | Moderate; can bend or rust | Hand wash; towel & oven dry immediately | Budget-conscious multi-shape sets |
| Injection Plastic | Medium | High; will not bend or deform | Top-rack dishwasher safe | Baking with kids & simple silhouettes |
| 3D-Printed PLA | High (Tapered wall) | Moderate; heat-sensitive | Hand wash lukewarm (<120°F) only | Custom lettering & trendy boutique themes |
8. Royal Icing Strategies for Baby Shower Shapes
Once your shapes are baked and cooled, decorating brings the baby shower theme to life. Professional results rely on mastering your royal icing consistencies.
Mastering Royal Icing Consistencies
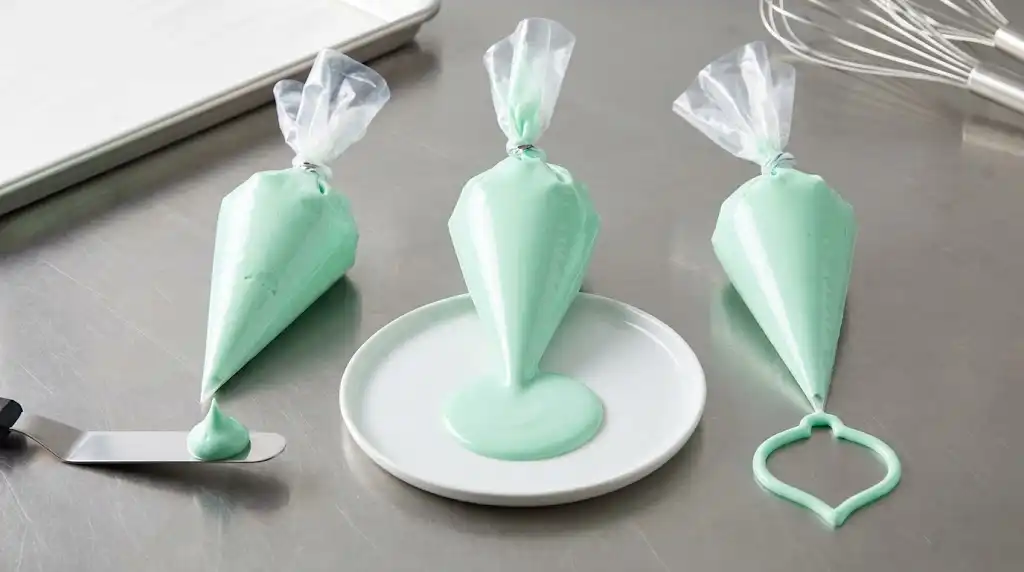
Royal icing made from powdered sugar, meringue powder, and water requires three basic consistencies:
- Outline / Piping Consistency (Toothpaste Texture): Holds a firm peak without spreading. Use this for piping borders, lettering, intricate floral details, and onesie seams.
- Flood Consistency (Warm Honey / Shampoo Texture, 15-Second Count): When you slice a butter knife through the surface, the line disappears completely in 15 seconds. Use this to flood large sections on bottles, plaques, and strollers.
- Stiff Detail Consistency (Frosting Texture): Holds sharp peaks. Perfect for dimensional accents like piped roses, leaves, or teddy bear ears.
Baby Shower Color Palette Strategy
Modern baby showers look best with cohesive, muted color palettes. Avoid straight primary food dyes. Instead, tone down bright gel colors with a tiny drop of ivory or warm brown gel color.
- Gender-Neutral Botanicals: Sage green, soft eucalyptus, warm linen, and metallic gold accents.
- Modern Earthy Neutrals: Terracotta, dusty peach, warm taupe, and cream white.
- Classic Soft Pastels: Dusty baby blue, powder pink, soft lemon, and French gray.
Three Beginner-Friendly Decorating Tutorials
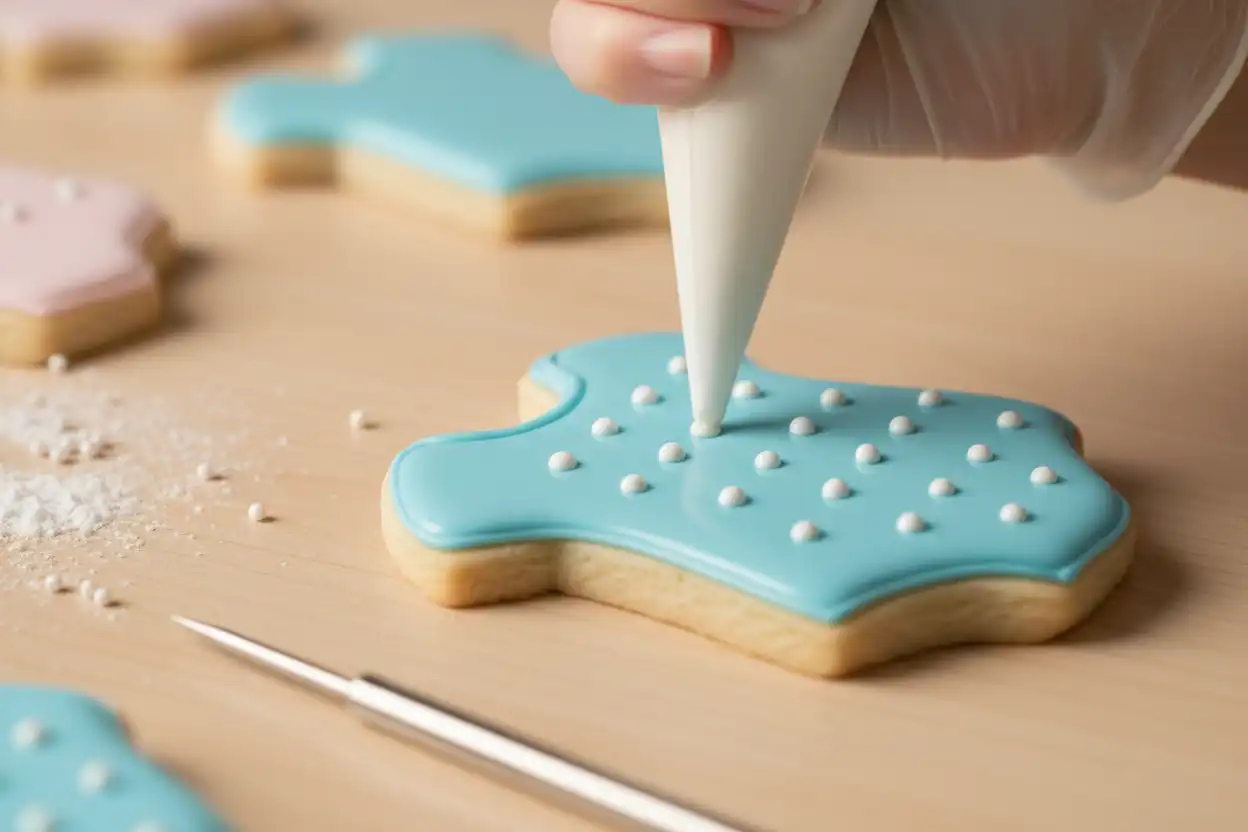
1. The Wet-on-Wet Polka Dot Onesie
- Pipe an outline around the onesie border using piping consistency icing.
- Flood the entire inside area immediately with your base color (such as soft sage) using a tipless piping bag.
- While the flood icing is still wet, pipe contrasting white dots into the surface. The dots will sink flush into the base layer, creating a flat pattern.
- Use a scribe tool or toothpick to pop air bubbles. Let dry for 8 to 12 hours.
2. The Modern Woodland Woodgrain Plaque
- Flood a hexagon or scalloped plaque cookie with warm white or light tan flood icing.
- Allow the flood layer to dry completely for 10 hours until hard.
- Dip a food-safe fan brush into diluted brown gel color (mixed with clear vanilla or vodka).
- Lightly drag the brush across the dried cookie surface to create a woodgrain texture.
- Pipe a custom baby name across the center using stiff brown or green piping icing.
3. The Quilted Baby Rattle
- Flood the round head of the rattle using your primary color. Let it dry for 30 minutes until a matte skin forms.
- Using an edible ink marker and a ruler, lightly draw intersecting diagonal grid lines across the head.
- Pipe thin lines of outline icing along the grid. Place a small sugar pearl at each intersection to finish the quilted look.
9. Packaging, Favor Presentation, and Storage Timelines
Proper storage and packaging protect your decorated cookies from moisture, air exposure, and physical damage before the shower.

Favor Packaging Options
- Individual Heat-Sealed Bags: Food-safe clear polypropylene bags (4″ x 6″) sealed with an impulse sealer keep cookies fresh and crisp for up to 3 weeks.
- Ribbon-Tied Favor Bags: Place each cookie in a self-sealing bag, punch a small hole above the seal line, and tie a silk or grosgrain ribbon with a custom “Thank You” tag.
- Clear Window Gift Boxes: Pack sets of 2 to 4 cookies on top of food-grade crinkle paper in a kraft window box for hosts, grandparents, or games prizes.
The Ideal Baking and Decorating Timeline
Spreading your tasks over a week keeps cookie preparation manageable and stress-free:
- 7 Days Before: Finalize shapes, verify cutter sizes, and prepare dough sheets. Freeze rolled dough between parchment sheets.
- 5 Days Before: Cut and bake all cookies. Store cooled, un-iced cookies in an airtight container between parchment layers at room temperature.
- 3 to 4 Days Before: Mix royal icing, mix colors, and complete all base flooding. Allow to dry overnight.
- 2 Days Before: Pipe fine details, add lettering, and paint any gold accents. Let dry completely for 12 hours.
- 1 Day Before: Heat seal cookies into individual favor bags and assemble the dessert table display.
10. Expert Tips for Delicate Cutters and Intricate Shapes
Detailed baby shower shapes—like stroller handles, rattle stems, and footprints—require special care to avoid tearing.
Pro Tip: When working with narrow cutter sections, place the cut dough sheet back into the freezer for 3 minutes before lifting away the scraps. Firm butter makes delicate stems easy to lift without stretching.
- Use Cornstarch for High-Detail 3D Stamps: When using combined cutter-and-stamp sets, dust the stamp face with cornstarch instead of flour. Cornstarch is finer, releases dough cleanly, and does not leave a chalky film after baking.
- Correcting Bent Metal Cutters: If a tin or lightweight steel cutter gets squeezed out of shape, trace the design on paper, then gently reshape the metal by hand around a wooden dowel or bottle neck until it matches the line.
- Reinforce Fragile Cookie Joints: Shapes with narrow joints (like the handle of a baby rattle) can break after baking. Add strength by piping a thick flood layer across the back of the cookie joint, or make your cut dough slightly thicker (5/16-inch).
11. Common Mistakes and How to Avoid Them
Watch out for these common cookie-making missteps to save time and avoid frustration.
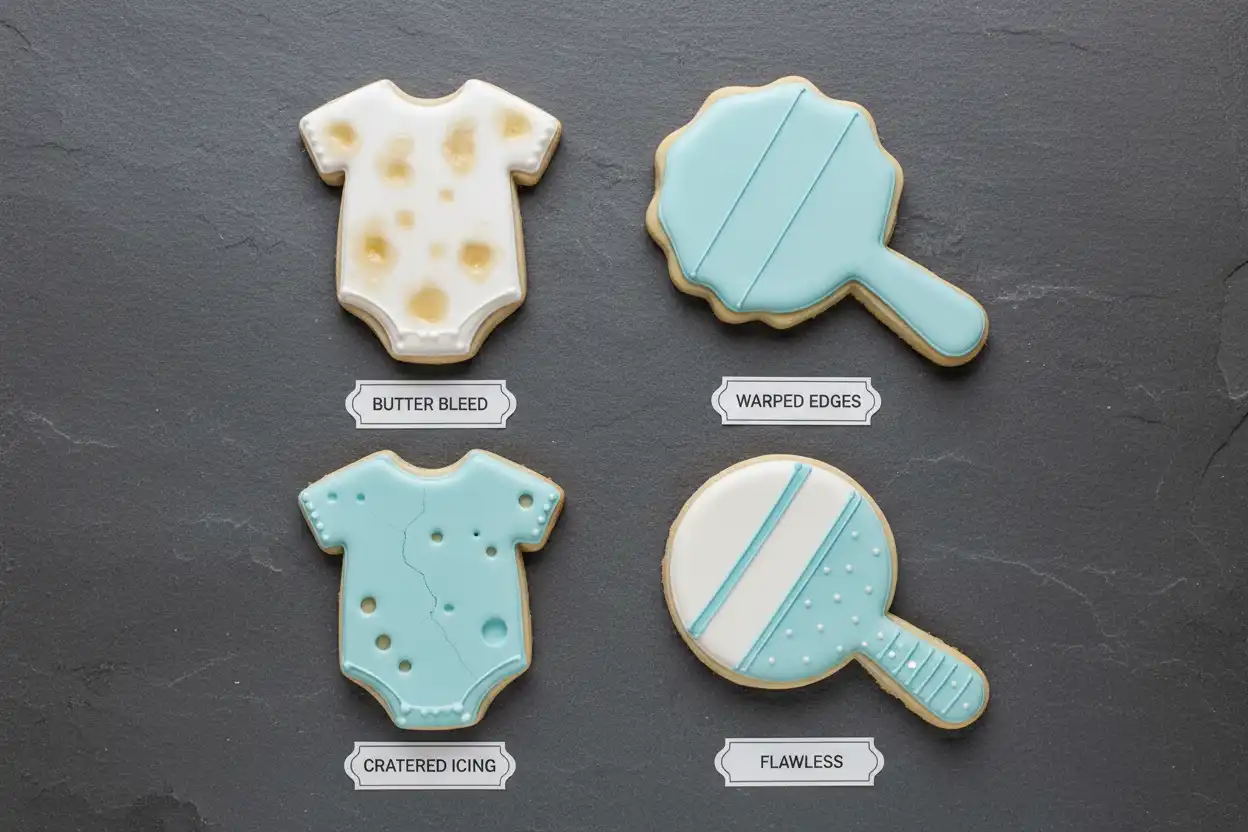
1. Cutting at Room Temperature
The Mistake: Cutting shapes from warm, soft dough leads to rounded corners and shapes that warp when moved to the pan.
The Solution: Keep your rolled dough sheets chilled until firm. If the dough bends when you lift it, return it to the refrigerator for 10 minutes before cutting.
2. Twisting the Cutter
The Mistake: Twisting the cutter back and forth to cut the dough. This action rounds the bottom edges and causes uneven baking expansion.
The Solution: Press the cutter straight down, apply firm pressure, and lift it straight up.
3. Using Too Much Leavener
The Mistake: Using standard drop-cookie recipes with a full teaspoon of baking powder or baking soda. The leavener expands the dough and blurs the cutter’s details.
The Solution: Use a dedicated no-spread cut-out cookie recipe that relies on flour structure and chilling rather than chemical leaveners.
4. Washing 3D-Printed Cutters in Hot Water
The Mistake: Placing PLA plastic cutters in the dishwasher or soaking them in hot sink water, which warps the plastic.
The Solution: Clean 3D-printed cutters only in lukewarm water using mild liquid soap and a soft brush.
5. Packaging Icing Before It Is Fully Cured
The Mistake: Heat-sealing cookies when the icing feels dry on top but remains soft underneath. Trapped moisture ruins the surface and clouds the packaging.
The Solution: Allow royal icing cookies to air dry for a full 8 to 12 hours (longer in humid rooms) before packaging them in airtight plastic.
12. Best Practices for Event Hosts and DIY Bakers
The Professional Baker’s Checklist
- Calibrate Your Oven: Use an inexpensive hanging oven thermometer to ensure your actual baking temperature matches the dial setting.
- Use Perforated Silicone Mats: Perforated baking mats allow steam to escape downward, creating flat, textured bottom surfaces that bake evenly.
- Maintain Food Safety: Wash all cutters thoroughly before their first use. If using vintage cutters, check for lead or deep corrosion before using them on food.
- Organize Batch Piping: Pipe all borders for a set of cookies first, then complete all flood fills, and finish with fine detail lines to keep icing consistency uniform.
13. Recommended Tools and Equipment
The right tools make cutting, baking, and decorating much easier:
- Adjustable Rolling Pin: A rolling pin with removable guide rings (1/4-inch and 5/16-inch) guarantees even dough thickness from edge to edge.
- Perforated Baking Mats (Air Mats): Helps prevent bottom bubbling, spreading, and uneven browning.
- Metal Bench Scraper: Essential for lifting delicate dough cuts from your work surface cleanly without warping.
- Tipless Piping Bags: Allows you to cut custom hole sizes for fine detail work without needing metal piping tips.
- Baking Scribe / Needle Tool: Used to pop royal icing bubbles, guide flood icing into tight corners, and clean up piping mistakes.
- Impulse Bag Sealer: Uses heat to seal favor bags airtight, keeping finished cookies fresh for weeks.
14. Related Internal Reading Suggestions
Explore these related guides to improve your event baking and hosting plans:
- The Complete Guide to Royal Icing Consistencies for Cut-Out Cookies
- Foolproof No-Spread Almond Vanilla Cut-Out Sugar Cookie Recipe
- How to Style a Baby Shower Dessert Table: Quantities, Platters, and Heights
- Applying Edible Gold Leaf and Metallic Luster Dust to Decorated Cookies
- Creative Cookie Favor Packaging Ideas for Showers, Weddings, and Birthdays
15. External Authority References
For more technical details on baking science and material safety, consult these resources:
- U.S. Food & Drug Administration (FDA): Food Contact Substances (FCS) Guidelines for Plastics and Polymers
- Kansas State University Extension: Safe Food Handling for Home-Baked Goods and Royal Icing Stabilization
- King Arthur Baking Science: Guide to Fat Temperatures, Gluten Formation, and Roll-Out Cookie Expansion
16. Key Takeaways
- Pick the Right Material: Choose stainless steel cutters for durability and sharp cuts, or food-safe 3D-printed PLA for custom, trendy shapes.
- Control Dough Temperature: Roll your dough out while warm, then chill thoroughly before cutting and freeze cut shapes for 10 minutes right before baking.
- Press Straight Down: Cut firmly downward without twisting to preserve sharp, clean edges.
- Balance Your Sets: Pair novelty baby shapes (onesies, bottles, rattles) with neutral plaque shapes for names, dates, and lettering.
- Dry Icing Thoroughly: Allow royal icing to dry for 8 to 12 hours before heat sealing in plastic favor bags.
17. Next Steps for Your Baby Shower Cookie Project
Planning, cutting, and decorating custom cookies adds a personal touch to any baby shower. By selecting quality cutters, using no-spread dough recipes, and following proper drying and packaging steps, you can create treats that match the quality of a professional bakery.
Select your favorite shape combination, prepare your dough sheets in advance, and enjoy the creative decorating process.
18. Frequently Asked Questions (FAQ)
What size cookie cutters work best for baby shower favors?
Standard cutters measuring 3.5 to 4 inches are ideal for baby shower favors. This size provides enough room for detailed royal icing and typography while fitting standard 4×6-inch self-sealing favor bags. Mini 2-inch cutters work best as snack bowl accents or cupcake toppers.
How do I prevent baby shower cookies from losing their shape in the oven?
To keep shapes sharp, use a recipe with minimal chemical leaveners and cream the butter and sugar only until combined. Roll dough between parchment sheets and chill until firm. Cut shapes with a flour-dusted cutter and freeze on the pan for 10 minutes before baking.
Are 3D-printed baby shower cookie cutters food safe?
3D-printed cutters made from food-grade PLA or PETG are safe for cutting cold dough when kept clean. Because print layers create micro-grooves, wash them by hand with lukewarm water, mild soap, and a soft brush. Never wash PLA cutters in a dishwasher, as high heat warps the plastic.
How many cookies should I make per guest for a baby shower?
Plan for 2 standard-sized (3.5-inch) cookies or 4 to 5 mini cookies per guest if serving on an open dessert table. If packaging individual cookies as take-home favors, calculate 1 boxed or heat-sealed cookie per guest, plus 10 extra cookies to cover any display accidents.
How far in advance can I make decorated baby shower cookies?
You can bake and decorate cookies 3 to 4 days before the event when stored at room temperature in airtight containers. Heat-sealed cookies in cellophane bags stay fresh for up to 3 weeks. You can also freeze undecorated baked cookies for up to 3 months.
What shapes are essential for a basic baby shower cookie set?
A versatile beginner set includes a onesie, baby bottle, rattle, and framed plaque. The onesie and bottle provide large surfaces for decorating, the rattle adds shape variety, and the plaque allows you to personalize cookies with baby names, dates, or messages.
How do I prevent cookie dough from sticking inside detailed cutters?
Dip the cutting rim in all-purpose flour or cornstarch before each cut, tapping off excess powder. Work with well-chilled dough sheets so the butter remains solid. If dough sticks in tight corners, gently tap the cutter frame or use a scribe tool to release the edges.
Can I use royal icing cookie cutters with fondant instead?
Yes. You can roll fondant to 1/8-inch thickness, cut out the same shapes using your cookie cutters, and attach the fondant to cooled cookies using a light brush of sugar syrup, piping gel, or thin royal icing. Embossing stamps also press cleanly into rolled fondant.