The Ultimate Guide to Xmas Cookie Decorating Ideas: Festive Designs, Easy Crafts, and Pro Techniques
Table of Contents
- 1. Quick Answer: Choosing the Right Decorating Style
- 2. Introduction: Why Holiday Cookie Decorating Matters
- 3. Master Your Base: Royal Icing vs. Buttercream vs. Glaze
- 4. Easy, Mess-Free Xmas Cookie Ideas for Kids
- 5. Showstopping Holiday Party & Cookie Exchange Designs
- 6. DIY & Craft-Inspired Cookie Art
- 7. Step-by-Step Guide to the Outline and Flood Technique
- 8. Decorating Methods Comparison Matrix
- 9. Expert Troubleshooting and Advanced Scenarios
- 10. Critical Mistakes to Avoid
- 11. Cookie Decorating Best Practices Checklist
- 12. Recommended Equipment and Pantry Staples
- 13. Related Baking Guides
- 14. Food Safety & Baking Science References
- 15. Key Takeaways
- 16. Frequently Asked Questions
Featured Summary: The Best Xmas Cookie Decorating Ideas
The best Christmas cookie decorating strategy depends on your goals, time, and skill level. For smooth, bakery-grade detail that hardens completely for stacking and shipping, use royal icing prepared at two consistencies: piping consistency for clean borders and 15-second flood consistency for glossy interiors.
If you prioritize rich flavor and quick execution, use American buttercream paired with piping tips (#1M star for trees, #352 for holly leaves). For high-volume family baking with young children, choose powdered sugar glaze with food coloring squeeze bottles, dipping bowls, and festive sanding sugars.
Top 3 Quick-Action Rules:
- Cool completely: Never decorate a cookie warm from the oven; residual heat melts icing fats instantly.
- Test your icing: Drag a butter knife through your icing bowl—it should level out flat within exactly 15 to 18 seconds for flood work.
- Prevent butter bleed: Dry royal icing cookies in front of a gentle tabletop fan or food dehydrator at 95°F (35°C).

Introduction: Why Holiday Cookie Decorating Matters
Baking Christmas cookies is one of the most enduring holiday traditions across the world. Transforming simple rolled dough into colorful, edible art brings families together, elevates holiday party dessert tables, and provides thoughtful, handmade gifts for neighbors and friends.
Whether you are a parent looking for stress-free holiday crafts, a beginner baker learning how to handle a piping bag, or an experienced cook seeking clean, intricate royal icing designs, this guide covers everything you need. You will discover practical methods, exact icing formulas, step-by-step techniques, and solutions to common baking problems.
By following these methods, you will eliminate uneven lines, sticky icing that refuses to set, and cracked surfaces. Let us turn your holiday baking into an enjoyable, reliable success.
Master Your Base: Royal Icing vs. Buttercream vs. Glaze
Choosing the correct icing base determines how your cookies look, taste, and hold up in storage. Each medium has distinct working times, drying mechanics, and flavor profiles.
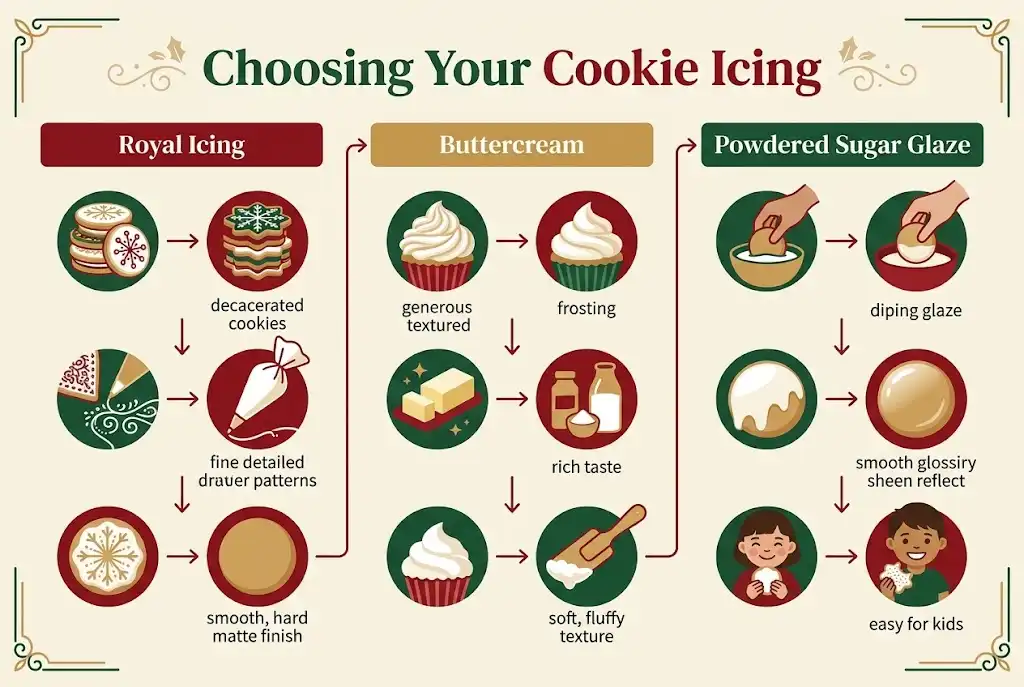
1. Royal Icing (The Gold Standard for Detail and Stacking)
Royal icing is made from powdered sugar, meringue powder (or pasteurized egg whites), and water. It is the best choice for intricate lines, lace patterns, monogramming, and cookies that must be stacked in gift tins or mailed in boxes.
When royal icing dries, the sugar crystallizes into a smooth, matte-to-semi-gloss shell that holds sharp edges indefinitely. The key to mastering royal icing is regulating water content to achieve specific consistencies: stiff for flowers and lettering, medium for outlines, and thin for flooding large areas.
2. Crust-Style American Buttercream (Rich Flavor and Quick Texture)
Buttercream provides superior richness and mouthfeel compared to sugar glazes. Using a ratio of unsalted butter, powdered sugar, heavy cream, and a splash of pure vanilla extract creates a decadent topping that pairs well with sugar cookies and gingerbread.
By keeping the liquid content modest, buttercream forms a thin, delicate “crust” on the exterior after 30 to 45 minutes while remaining soft and creamy inside. While you cannot stack buttercream cookies in multiple layers without parchment separators, they are ideal for platters and holiday dessert boards.
3. Simple Powdered Sugar Glaze (Quick, Dippable, and Kid-Friendly)
A classic glaze combines confectioners’ sugar, milk (or water), and a teaspoon of light corn syrup. The corn syrup is essential because it gives the glaze a glossy sheen and a pliable bite that resists brittle cracking.
Glaze sets with a soft exterior snap after several hours. It is the fastest medium for dipping large batches of cookies, drizzling over spiced shortbread, or letting children decorate with paintbrushes and sprinkles.
Easy, Mess-Free Xmas Cookie Ideas for Kids
Decorating with children should be creative and fun, not stressful. Managing icing consistencies and minimizing counter spills ensures a smooth, festive experience for the whole family.
1. Melted Snowman Cookies
This design is forgiving because irregular shapes enhance the final look. Bake round sugar cookies or soft butter cookies as your base.
Spoon a generous pool of white powdered sugar glaze or flood icing onto the center of each cookie, letting it drip naturally toward the edges. Place a standard marshmallow near the top edge while the icing is wet to serve as the melting head.
Once the base sets for 20 minutes, let children use orange and black edible food pens or mini piping bags to draw stick arms, coal eyes, a carrot nose, and tiny buttons down the melted body.
2. Muffin-Tin Sprinkle Stations
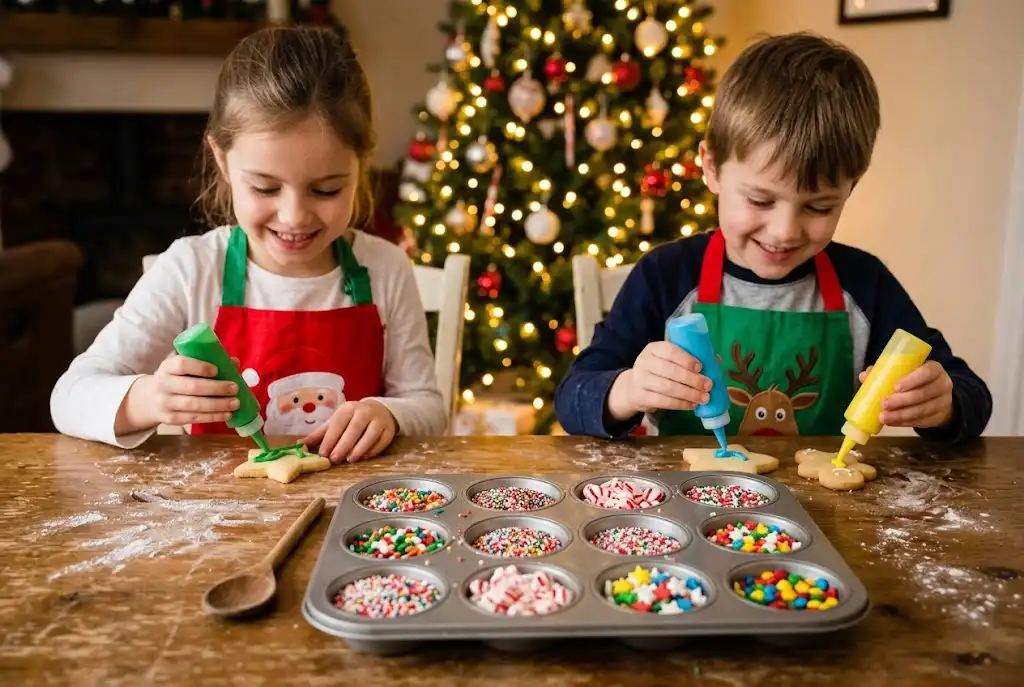
Contain sprinkle chaos by placing standard 12-cup muffin tins in the center of the decorating table. Fill each cup with different toppings: crushed candy canes, mini chocolate chips, gold sanding sugar, red nonpareils, and festive holiday sprinkles.
Provide each child with their own flat tray and cookies pre-outlined with icing. Kids can spoon toppings directly over their cookies, allowing stray sprinkles to fall into the tray rather than onto the floor.
3. Squeeze-Bottle Cookie Flooding
Traditional piping bags can split or burst when squeezed with small, uneven hands. Transfer flood-consistency glaze or royal icing into small, flexible plastic condiment squeeze bottles with narrow tips.
Squeeze bottles give children greater grip control and prevent backflow messes. They allow young decorators to fill in tree shapes and ornament cutouts without tearing delicate bags.
4. Edible Marker Christmas Doodles
Flood plain round, bell, or star sugar cookies with white royal icing the night before and let them dry completely until hard. Provide children with sets of food-safe edible ink markers.
Kids can draw holiday scenes, write personalized messages, or sketch Santa hats directly onto the hard sugar surface like drawing on paper. This activity creates zero liquid mess and lets children create detailed, customized art.
Showstopping Holiday Party & Cookie Exchange Designs
When hosting a holiday gathering or participating in a competitive Christmas cookie exchange, professional visual appeal and structural durability are paramount.

1. Geometric Monochromatic Snowflakes
Monochromatic cookies create a sophisticated presentation. Cut classic six-point snowflake shapes from vanilla bean sugar cookie dough or rich gingerbread.
Flood the background in deep navy, slate gray, or pure winter white. Using stiff white piping icing fitted with a #1.5 round piping tip, add fine geometric details: concentric hexagonal borders, delicate lattice lines, and tiny accent dots along each branch.
While the piped lines are wet, dust them with ultra-fine edible disco glitter or white sparkling sugar to capture ambient party lighting.
2. Buttercream Holiday Evergreen Wreaths
Bake ring-shaped cookies by cutting standard rounds and removing the center with a smaller circular cutter. Fit a piping bag with a #352 leaf tip filled with two-tone green buttercream (blend forest green and moss green side-by-side in the bag for depth).
Pipe overlapping leaf strokes around the entire ring base to form a textured foliage garland. Finish the wreath by placing dried cranberry pieces, red candy pearls, or a small hand-piped red royal icing bow at the bottom center.
3. Painted Metallic and Stenciled Baubles
Large ornament-shaped cookies provide an ideal flat canvas for mixed-media techniques. Flood the ornament with matte black or dark emerald royal icing and let it dry for 12 hours.
Hold a food-grade holiday stencil (such as damask or snowflake patterns) firmly against the dried cookie surface. Spread thick white or gold royal icing across the stencil with an offset spatula, scraping away excess in a single fluid stroke.
Carefully lift the stencil vertically to reveal a raised embossed pattern. Mix metallic edible gold luster dust with a few drops of high-proof clear food-grade alcohol or lemon extract, then paint the hanging cap and borders with a fine-tipped brush.
DIY & Craft-Inspired Cookie Art
For crafters and DIY enthusiasts, cookies can function as edible craft materials. These advanced designs use creative textures, dimensional piping, and structural baking.

1. Isomalt Stained-Glass Window Cookies
Stained-glass cookies look striking on platters or hung in front of holiday tree lights. Roll out a firm gingerbread or cardamom spiced shortbread dough to 1/4-inch thickness.
Cut large holiday shapes (lanterns, cathedral windows, stars) and cut out internal window panes using miniature craft cutters. Place the cut dough onto a perforated silicone baking mat (Silpain) on a sturdy baking sheet.
During the final 5 minutes of baking, drop crushed hard candies (such as Jolly Ranchers) or pre-cooked isomalt nibs into the cutout openings. The candy melts evenly into the empty spaces, cooling into a translucent, crystal-clear pane that bonds directly with the cookie walls.
2. “Ugly Sweater” Cable-Knit Textures
Cut sweater-shaped cookies and flood them with a solid, festive background color like cranberry red or pine green. Allow the base coat to dry for at least 3 hours.
Using stiff-consistency royal icing in a contrasting cream color, pipe alternating columns of textured stitch patterns across the body and sleeves. Replicate classic knitting stitches: double ropes, braided cross-hatches, zigzag ribbing, and rows of tiny textured dots.
Finish the collar, cuffs, and hem with a heavy bead border or a dusting of white coarse sanding sugar to replicate fuzzy fleece lining.
3. Dimensional 3D Stand-Up Cookie Trees
Create architectural centerpieces by baking graduated star shapes ranging from 1 inch to 5 inches wide. You will need 2 cookies of each size for a standard centerpiece tree.
Stack the baked stars from largest to smallest, rotating the points slightly at each layer to create organic, tiered tree branches. Glue each layer together using a generous dollop of stiff green buttercream or royal icing in the center.
Once stacked, pipe downward stars along the tips with a #18 star tip, dust with powdered sugar snow, and crown the top with a miniature golden piped star.
Step-by-Step Guide to the Outline and Flood Technique
The outline and flood technique is the foundation of professional cookie decorating. It separates the fluid base layer from fine, structural line work, giving you flat, mirror-like surfaces.
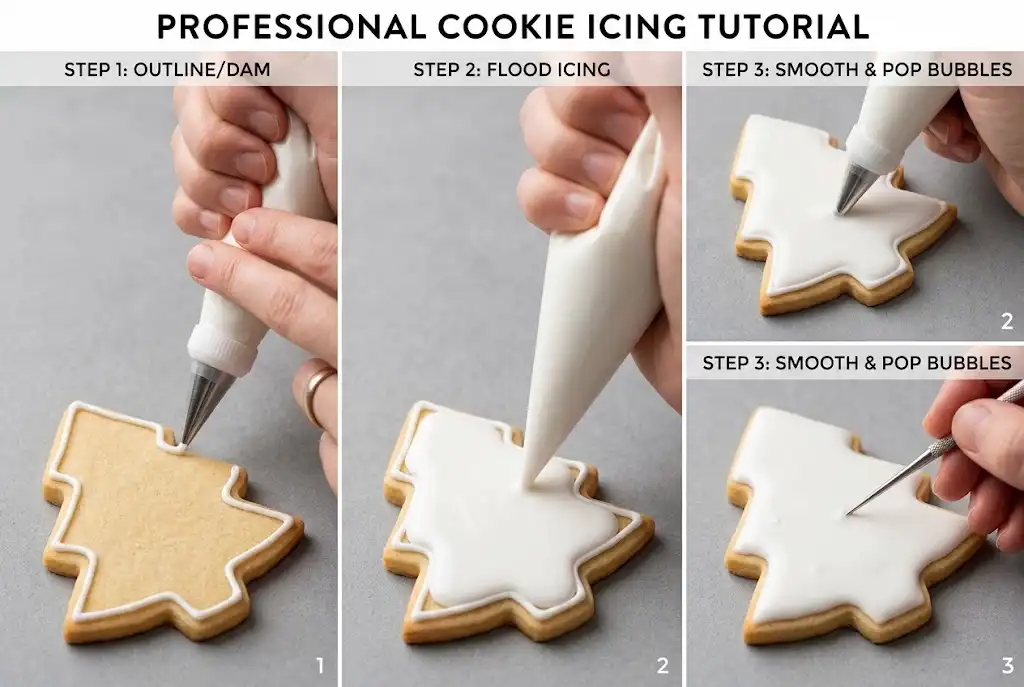
Step 1: Prepare Two Icing Consistencies
What: Create piping-consistency icing and flood-consistency icing from the same color batch.
Why: Piping icing acts as a dam to contain liquid flood icing, preventing leaks and runs down the cookie edge.
How: Keep your base royal icing stiff. Scoop 1/3 into a piping bag fitted with a #2 round tip. Thin the remaining 2/3 by adding room-temperature water a few drops at a time until a knife cut across the surface disappears in exactly 15 seconds.
Common Mistake: Adding too much water too fast. Always thin royal icing with a spray bottle or teaspoon.
Pro Tip: Let your thinned flood icing rest in a covered bowl for 15 minutes before bagging. This allows trapped air bubbles to rise to the top and pop.
Step 2: Pipe the Perimeter Dam (Outline)
What: Trace the outer boundary of the cookie with piping-consistency icing.
Why: Creates a clean, defined visual border and an impermeable barrier for the liquid flood.
How: Hold the piping bag at a 45-degree angle approximately 1/8 inch inside the baked edge. Touch the tip to the surface to anchor the icing, lift the tip slightly into the air to let the string fall naturally along the contour, and touch down at corners.
Common Mistake: Dragging the metal tip directly against the cookie crust, which creates jagged, broken lines.
Pro Tip: Keep steady, even hand pressure and look two inches ahead of where the icing line is landing.
Step 3: Flood the Interior Canvas
What: Fill the bordered area with 15-second flood icing.
Why: Creates a smooth, level base layer for your design.
How: Cut a small opening (equivalent to a #3 tip) in your flood bag. Starting from the inner edge of your outline, pipe in continuous concentric circles or back-and-forth ribbons toward the center until roughly 85% of the surface is covered.
Common Mistake: Overfilling the cookie, which causes the surface tension to break and spill over the piped dam.
Pro Tip: Under-fill slightly; the icing will self-level and expand toward the borders within 30 seconds.
Step 4: Scribe, Tap, and De-Air
What: Smooth the wet flood icing and eliminate internal air pockets.
Why: Prevents sunken centers, cratering, and pinholes as the sugar dries.
How: Use a metal cookie scribe or a clean toothpick to swirl the wet icing into empty corners using small circular motions. Pick up the cookie and gently tap the bottom against your counter three times to bring hidden micro-bubbles to the surface, then pop them with the scribe needle.
Common Mistake: Waiting too long to tap. Once a crust forms (after 60 to 90 seconds), agitating the cookie will wrinkle the surface.
Pro Tip: Place your cookie on an individual mini swivel turntable for effortless 360-degree decorating access.
Step 5: Master the Wet-on-Wet Technique
What: Pipe contrasting flood-consistency colors directly into the wet base flood layer immediately.
Why: Creates perfectly flat, integrated patterns like polka dots, chevron waves, and marbled hearts with zero raised texture.
How: Immediately after flooding a base (e.g., white), pipe contrasting dots (red) across the surface. For hearts, pull a clean scribe tool straight down through the center of each dot. For marbled garlands, pipe parallel straight lines across the cookie and drag the scribe alternately up and down perpendicular to the lines.
Common Mistake: Using stiff icing for the dots or lines, which makes them sit on top rather than sinking flush into the background.
Pro Tip: Work on one cookie at a time when using wet-on-wet techniques to prevent the base coat from crusting before you finish the pattern.
Step 6: Dehydrate and Dry Completely
What: Dry the decorated cookie in a temperature-controlled, low-humidity environment.
Why: Rapid drying locks in high surface gloss and prevents butter bleed from the cookie dough into the icing.
How: Place wet cookies directly in front of a gentle tabletop fan on low speed, or inside a food dehydrator set to 95°F (35°C) for the first 30 to 45 minutes to set the crust. Then, allow the cookies to air-dry on flat sheet pans for 8 to 12 hours before packaging.
Common Mistake: Packing cookies into airtight containers when the top feels dry to the touch but the core remains soft.
Pro Tip: A fully dried royal icing cookie should sound like a firm porcelain plate when lightly tapped with a fingernail.
Decorating Methods Comparison Matrix
Use this reference table to match the best decorating technique, icing medium, and difficulty level to your specific project needs.
| Technique / Medium | Ideal Use Case | Skill Level | Drying Time | Stackable & Shippable? | Flavor Profile |
|---|---|---|---|---|---|
| Royal Icing (Outline & Flood) | Detailed art, monograms, gift boxes | Intermediate to Advanced | 8–12 hours | Yes (Fully hard) | Sweet, clean vanilla or almond note |
| Crusting Buttercream | Platters, textured trees, fast decorating | Beginner to Intermediate | 1–2 hours (Outer crust) | No (Single layer only) | Rich, buttery, dairy-forward |
| Corn Syrup Glaze | Quick dipping, high-volume baking | Beginner | 4–6 hours | Moderate (With parchment) | Glossy, sweet, soft bite |
| Edible Marker Drawing | Kids’ activities, hand lettering | All skill levels | Immediate (On dry base) | Yes (Fully hard) | Neutral (Matches base icing) |
| Isomalt / Stained Glass | Edible ornaments, showpieces | Advanced | 15 minutes (Cooling) | Yes (Moisture-sensitive) | Hard candy crunch, mild sweetness |
Expert Troubleshooting and Advanced Scenarios
Professional cookiers rely on specific adjustments to handle humidity, color physics, and transport logistics. Use these guidelines when tackling complex projects.
1. Preventing “Butter Bleed” in Humid Environments
Butter bleed occurs when fats from the butter in your cookie dough migrate upward into the dried royal icing, creating unsightly yellow, greasy blotches. This issue is especially common in humid climates or when baking cookies with high butter-to-flour ratios.
To eliminate butter bleed, bake your cut-out cookies thoroughly to ensure no trapped moisture remains near the surface. Let the baked cookies rest on paper towels for 4 hours to wick away surface oils before you begin decorating.
Additionally, dry your flooded cookies under a moving air source or in a dehydrator immediately after piping. Rapid evaporation forms a crystalline barrier that prevents fat migration.
2. Preventing Cratering in Small Cutouts and Fine Sections
Cratering happens when small flooded areas (such as narrow snowman arms, small holly berries, or miniature star points) collapse in the center as they dry. This collapse is caused by surface tension pulling inward without sufficient underlying volume.
To prevent cratering, pipe a small “structural anchor” of thick piping icing into the center of the small section first. Let this base anchor dry for 10 minutes, then flood over it with your standard flood icing.
Alternatively, use a slightly thicker flood consistency (20 to 22-second icing) for any section smaller than a penny. Thicker icing holds its internal volume as the moisture evaporates.
3. Eliminating Color Bleed Between Deep Reds and Bright Whites
Dark food colorings—especially Christmas Red and Forest Green—contain high concentrations of food dyes that can bleed into neighboring white icing within 24 hours.
Always use concentrated gel paste or oil-free powder colors rather than liquid grocery-store drops, which introduce excess water. When mixing deep red or green icing, prepare the colors 24 hours in advance; the color will naturally deepen two shades as it rests, reducing the total amount of dye needed.
Ensure your white base layer is dried under a fan for at least 4 hours before piping dark accent details on top.
4. Egg-Free and Vegan Royal Icing Alternative
If you or your guests have egg allergies, replace standard meringue powder or egg whites with reduced aquafaba (the liquid from a can of unsalted chickpeas). Simmer 1 cup of aquafaba in a small saucepan until it reduces to 1/2 cup, concentrating the proteins, then chill completely.
Whip 1/3 cup of reduced aquafaba with 1/4 teaspoon of cream of tartar until foamy, then gradually incorporate 4 cups of sifted powdered sugar and 1 teaspoon of light corn syrup. This plant-based royal icing pipes, floods, and hardens identically to traditional egg-based formulas.
Critical Mistakes to Avoid
Avoiding a few common decorating mistakes will save you hours of effort and protect your finished cookies.
- Decorating Warm Cookies: Piping icing onto a cookie that has even slight residual heat melts the emulsifiers in both royal icing and buttercream. This leads to runny icing, separation, and permanent sticking. Always allow cookies to cool on a flat wire rack for at least 2 full hours.
- Skipping the Sifter for Powdered Sugar: Tiny, hard clumps of sugar will jam narrow piping tips (#1 and #2) and tear tipless piping bags. Always pass confectioners’ sugar through a fine-mesh stainless steel sieve before whipping.
- Using Liquid Food Coloring: Grocery-store liquid food coloring dilutes your carefully measured icing consistency and alters drying times. Always use professional concentrated gel pastes.
- Over-whipping Royal Icing: Whipping royal icing on high speed incorporates millions of tiny air bubbles that cause a spongy texture, cratering, and fragile dried surfaces. Always mix royal icing on the lowest speed using a paddle attachment, never a wire whip.
- Stacking Cookies Too Early: Royal icing may feel dry to a light touch after 2 hours, but the internal moisture takes 8 to 12 hours to fully evaporate. Stacking prematurely will crush the internal structure and leave finger indents.
Cookie Decorating Best Practices Checklist
Keep your decorating workspace organized and efficient with this pre-baking checklist.
- Choose a No-Spread Dough: Use a rolled sugar cookie or gingerbread recipe that contains minimal chemical leavener (baking powder or baking soda) and chill the cut shapes for 15 minutes in the freezer prior to baking to guarantee sharp edges.
- Maintain Clean Piping Tips: Keep a damp paper towel folded inside a small glass at your station. Stand your piping bags tip-down inside the glass when not in use to prevent icing from crusting and plugging the opening.
- Manage Ambient Humidity: High ambient moisture slows drying times. Run an air conditioner or dehumidifier in your kitchen if your space exceeds 50% relative humidity.
- Color Mix Strategy: Always color your lightest icing first (white, light pink, pale yellow) and use remaining bases to create darker tones (red, green, navy). This saves time and minimizes food coloring waste.
- Proper Storage Technique: Store fully dried decorated cookies in single layers or separated by parchment sheets inside airtight tins. Keep them at cool room temperature away from direct sunlight, which fades edible dyes.
Recommended Equipment and Pantry Staples
Having the right tools on hand makes cookie decorating far easier and more consistent.
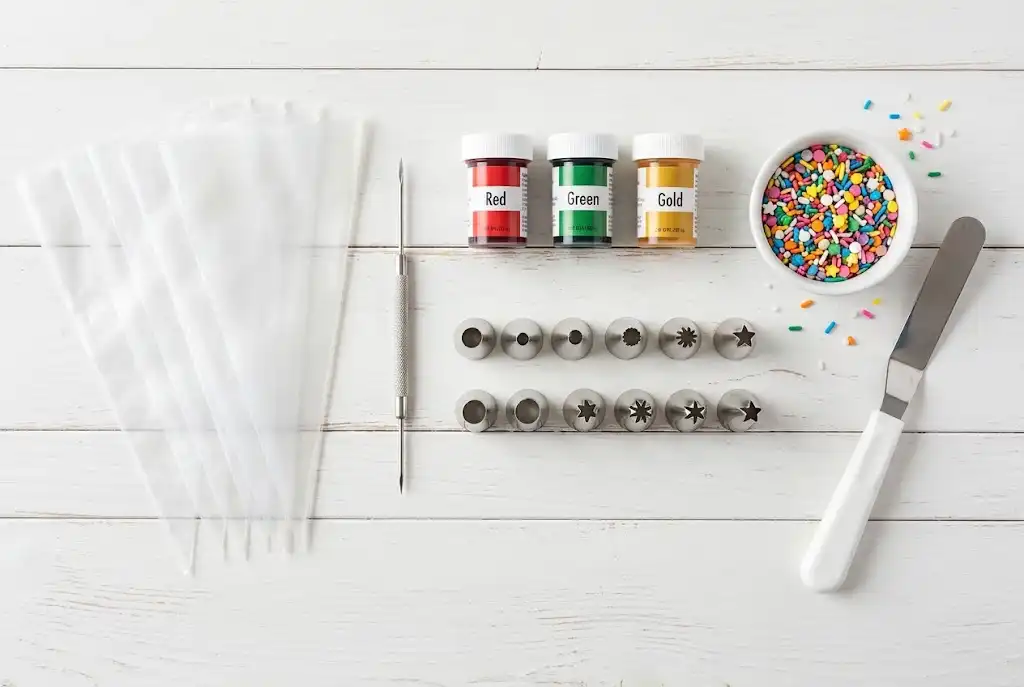
- Tipless Piping Bags (10-inch or 12-inch): Flexible, textured plastic bags that allow precise micro-cuts without needing metal couplers or separate tips.
- Metal Cookie Scribe Tool: A fine stainless steel needle tool essential for popping micro-bubbles, guiding flood icing into sharp corners, and drawing fine wet-on-wet details.
- Concentrated Gel Paste Colors: High-pigment coloring gels that yield vibrant holiday shades without altering your icing’s moisture balance.
- Meringue Powder: A pasteurized, shelf-stable alternative to raw egg whites that provides clean whipping performance, structural stability, and reliable hardening.
- Edible Ink Food Pens: Fine-point, food-safe markers for sketching design guides, drawing faces, and outlining fine script on dried surfaces.
- Perforated Silicone Baking Mats: Mats that promote even heat circulation, preventing dough spread and ensuring perfectly flat cookie bottoms.
Related Baking Guides
Expand your holiday baking repertoire with our complete collection of seasonal recipes and decorating tutorials:
- The Ultimate No-Spread Cut-Out Sugar Cookie Recipe: Master the master dough that holds sharp edges through the oven.
- Foolproof Royal Icing Recipe with Meringue Powder: Step-by-step ratios for achieving perfect outline, flood, and stiff consistencies.
- Classic Spiced Gingerbread Men and 3D Cookie Houses: Sturdy, aromatic gingerbread construction recipes and assembly guides.
- How to Pack and Ship Holiday Cookies Safely: Professional wrapping and shipping methods to ensure cookies arrive intact across the country.
- Festive Shortbread Variations: Spiced, dipped, and stamped holiday shortbread cookies for elegant dessert tables.
Food Safety & Baking Science References
When preparing holiday food gifts for friends, family, and public exchanges, adhere to verified food safety guidelines:
- U.S. Food and Drug Administration (FDA): Consult official guidelines regarding safe egg handling and the use of pasteurized egg products in non-cooked icings.
- USDA Food Safety and Inspection Service: Review standard home storage timelines for baked goods containing dairy-based buttercreams versus dried sugar icings.
- Exploratorium Science of Cooking: Reference fundamental food chemistry resources to understand sugar crystallization, sucrose-water ratios, and starch gelatinization in rolled doughs.
Key Takeaways for Perfect Holiday Cookies
- Match your icing medium to your timeline: royal icing for stackable detail, crusting buttercream for flavor, and glaze for fast dipping.
- Master the 15-second royal icing rule for smooth, self-leveling flood surfaces without overflow.
- Use squeeze bottles and muffin-tin sprinkle trays to keep kid decorating sessions fun and clean.
- Dry flooded cookies under a moving fan or at 95°F in a dehydrator to achieve maximum gloss and prevent butter bleed.
- Avoid liquid grocery store dyes; always use concentrated gel pastes to preserve icing consistency.
Conclusion
Mastering festive Christmas cookie decorating comes down to understanding your icing consistencies, preparing your workspace, and letting each layer dry properly. Whether you are crafting simple melted snowmen with your kids or piping delicate lace snowflakes for an upscale holiday party, these practical techniques will help you produce beautiful results every time.
Gather your cookie cutters, mix your icing colors in advance, and give yourself plenty of time to enjoy the creative process. Put on some holiday music, invite your loved ones into the kitchen, and bring your festive cookie designs to life.
Frequently Asked Questions
How far in advance can I decorate Christmas cookies?
You can decorate royal icing cookies up to 7 days in advance when stored at room temperature in an airtight container with parchment paper between layers. Baked, undecorated sugar cookies can be frozen for up to 3 months. Fully decorated royal icing cookies can also be frozen for up to 2 months if sealed in airtight containers.
Why is my royal icing drying dull instead of shiny?
Royal icing dries dull or matte when it dries too slowly in a humid room or contains excess water. To achieve a glossy, professional finish, add 1 teaspoon of light corn syrup to your icing batch and dry your freshly decorated cookies under a gentle tabletop fan or in a food dehydrator at 95°F for the first hour.
Can I use milk instead of water to thin royal icing?
No, you should never use milk to thin royal icing intended for drying and stacking. The fats and proteins in milk break down the crystalline sugar structure, preventing the icing from hardening properly. Milk also introduces dairy that spoils if stored at room temperature. Always use room-temperature filtered water to thin royal icing.
How do I keep my sugar cookies from losing their shape when baking?
To prevent spreading, choose a dough recipe without baking powder or baking soda. Use cold butter, avoid over-creaming the butter and sugar, and chill cut cookie shapes on their baking sheet in the freezer for 15 minutes before placing them in a preheated oven. Cold fat holds its structural form until the flour proteins set.
What is the easiest icing for young children to use?
A simple powdered sugar glaze made with confectioners’ sugar, milk, and light corn syrup placed in small plastic squeeze bottles is the easiest option for children. It requires minimal grip strength, creates far less mess than traditional piping bags, and sets firm enough to handle within 4 hours without specialized tools.
Why did my royal icing develop yellow grease spots after drying?
Yellow grease spots are caused by “butter bleed,” where the fats from the baked cookie leach into the porous royal icing. To prevent this, bake your cookies thoroughly so no underbaked pockets remain, allow baked cookies to rest on paper towels for 4 hours before decorating, and dry decorated cookies rapidly in front of a fan.
How long does it take for royal icing to dry completely for stacking?
Royal icing requires 8 to 12 hours (overnight) at room temperature to dry completely through to the cookie base. While the surface forms a delicate crust within 30 minutes, stacking or packaging cookies earlier than 8 hours will crush the soft interior icing layer and ruin your designs.